The Tool Desk
Outbyte Driver Updater FREEScan for outdated or missing drivers - takes under a minuteDriver Scan →Outbyte PC Repair FREERepair Windows errors before they cause bigger problemsFix Now →Steam’s built-in Game Recording feature can capture games launched through Steam without OBS or another recorder. Open Steam → Settings → Game Recording, then choose background recording for moments you might want to save after they happen, or on-demand recording for sessions you start and stop yourself. Steam captures gameplay, not your Windows desktop or unrelated apps. If you need desktop capture or more production controls, Xbox Game Bar and OBS are alternatives.
Before you start
- Update and restart the Steam desktop client, then confirm that your game launches from your Steam Library. Steam Game Recording became available to all users in November 2024; Steam ended support for Windows 7 and 8 in a November 5, 2024 client update. For this guide, use a currently supported Windows 10 or Windows 11 installation and keep Steam updated. Steam’s availability announcement.
- Make sure the Steam Overlay is enabled and opens in the game with Shift + Tab. Steam documents the Overlay as a way to reach the in-game recording controls. Steam’s recording guide.
- Choose the mode that fits the session: background recording for a recent highlight, or manual recording for a session you know you want to capture.
- Allow adequate disk space. Steam lets you set the recording location and storage allocation; recording duration and file size depend on quality, frame rate, the game and available space.
- Plan a short test recording so you can confirm the picture, game sound and microphone before playing for a long time.
Enable Steam Game Recording
- Open the Steam desktop client.
- Select Steam in the upper-left corner, then choose Settings.
- Open Game Recording.
- Choose the mode: Off/Don’t record, Record in Background, or Record on Demand/Record Manually. The exact wording can vary with Steam client updates.
- Set the recording location and maximum disk-space allocation. Choose a drive with enough free space for the footage you intend to keep.
- Review the available video quality, frame-rate, encoder, audio and shortcut controls. Options can depend on your hardware and client version.
- Launch a Steam game and check the in-game Game Recording panel or timeline to confirm that capture is active.
You can usually reach Game Recording controls while playing by pressing Shift + Tab to open the Steam Overlay, then selecting Game Recording. This requires the Overlay to be enabled and functioning. Steam’s Game Recording announcement.
Choose between background and manual recording
| Mode | What it does | Best for | What to watch for |
|---|---|---|---|
| Record in Background | Continuously retains recent gameplay within the storage limit you set. | Saving an unexpected play, match-winning moment or mistake after it happens. | Older footage is temporary and may be overwritten as the limit is reached. The available window varies with storage allocation, quality, frame rate and the game; do not assume a fixed number of minutes. |
| Record on Demand / Record Manually | Records after you start it and stops when you end the recording. | Full sessions, walkthroughs, a match or a planned segment. | Check your assigned start/stop shortcut in Game Recording settings. An official game-specific Steam guide lists Ctrl + F11, but that is not a universal binding. Steam’s game-specific guide. |
Use background mode when you want a buffer of recent gameplay; save important moments promptly. Choose manual mode when you want to control exactly when a recording begins and ends.
Start and stop a manual recording
- Launch the game through Steam and open Shift + Tab → Game Recording, or check the shortcut assigned in Steam → Settings → Game Recording.
- Start recording with the configured shortcut or the on-screen control.
- Play as usual. Watch for the recording status indicator if available.
- Use the same shortcut or the on-screen control to stop recording.
- Open View → Recordings & Screenshots in the Steam client to review the recording and create a clip.
Steam allows recording shortcuts to be configured, so use the binding shown in your client rather than relying on a hotkey from another game or an older guide. The Steam Overlay and recording workflow are described in Steam’s Game Recording guide.
Do these 3 things before closing this tab:
1Repair Windows errors before they cause bigger problems2Scan for outdated or missing drivers - takes under a minute3Clear out junk files and repair common Windows errors#1 Best Overall

- 【1080P HD High Quality】Capture resolution up to 1080p for video source and it is ideal for all HDMI devices such as PS4, PS3, Xbox One, Xbox 360, Wii U, DVDs, DSLR, Camera, Security Camera and set top box. Note: Video input supports 4K30/60Hz and 1080p120/144Hz. Does not support 4K120Hz/144Hz. Output supports up to 2K30Hz.
- 【Plug and Play】No driver or external power supply required, true PnP. Once plugged in, the device is identified automatically as a webcam. Detect input and adjust output automatically. Won't occupy CPU, optional audio capture. No freeze with correct setting.
- 【Compatible with Multiple Systems】suitable for Windows and Mac OS. High speed USB 3.0 technology and superior low latency technology makes it easier for you to transmit live streaming to Twitch, Youtube, Facebook, Twitter, OBS, Potplayer and VLC.
- 【HDMI LOOP-OUT】Based on the high-speed USB 3.0 technology, it can capture one single channel HD HDMI video signal. There is no delay when you are playing game live.
- 【Support Mic-in for Commentary】Rybozen capture card has microphone input and you can use it to add external commentary when playing a game. Please note: it only accepts 3.5mm TRS standard microphone headset.
Save a moment from background footage
- While the game is running, press Shift + Tab and open the Game Recording timeline. You can also review recordings later through View → Recordings & Screenshots.
- Find the moment on the timeline. Select Clip, or right-click the timeline and choose the option to start a clip.
- Adjust the clip’s start and end points to include the section you want.
- Choose Save/Share, then pick a destination: save in Steam, export a video file, copy to the clipboard, send to another device, or create a Steam share link. Options may vary by client version.
Background footage is a temporary buffer, not a permanent archive. If a moment matters, clip and save it before newer footage pushes it out of the available window. Steam-hosted share links may expire after two days, so export or save an important clip locally. Steam’s Game Recording announcement.
Add a marker, then trim the clip
Use a marker to flag a moment for later without stopping to make a clip. Steam documents Ctrl + F12 as the marker shortcut; check your Game Recording settings in case you or an update changed the binding. A blue marker appears on the timeline. You can also add one from the timeline controls or its context menu. Some games contribute event markers, such as kills or objectives, but those are game-specific rather than guaranteed. Steam’s Game Recording announcement.
After marking a moment, open the timeline, locate the marker and select a range around it. Adjust both ends before saving or exporting so the clip starts and ends where you want.
Rank #2

- High-Quality Video Capture, 4K HDMI Capture Card Ready: Capture smooth and vibrant video with this 4K HDMI capture card, engineered for gamers and content creators who demand crisp 1080P 60FPS video quality. Whether you're streaming to Twitch or recording gameplay for YouTube, your footage will look professional and detailed
- Plug-and-Play USB Capture Card, No Drivers Needed: Designed as a USB capture card for streaming, this device works instantly out of the box, just plug into your PC or laptop and start capturing. Fully compatible with popular software like OBS Studio, Streamlabs, and XSplit, making setup quick and stress-free for beginners and pros alike
- Universal Compatibility PS5, Xbox, Switch & More: Stream or record gameplay from virtually any HDMI-enabled device including Nintendo Switch, PS5, Xbox Series X, DSLR cameras, and PCs. The video capture card for gaming supports seamless passthrough so you can play without lag while your audience watches every frame in real time
- Low-Latency Performance for Smooth Streaming: This capture card for streaming minimizes delay between gameplay and broadcast, so you get reliable, low-latency capture that works well for competitive gaming, live broadcasts, and podcast sessions. Suitable for those building their channel with high-quality, engaging content
- Compact & Portable Design for Content Creators: Lightweight and portable, this USB 3.0 capture card works well for creators who travel or switch gaming setups often. Throw it in your bag and stream or record wherever you are, at home, events, LAN parties, streaming or studio sessions
Export a Steam recording as an MP4
A Steam timeline or temporary background recording is not necessarily an ordinary video file you can open in another player. To create a conventional file, select the desired range, create a clip, choose Save/Share → Export Video File, and confirm the destination. Steam exports clips as .mp4 files. If the clip is missing from a folder, check the destination chosen during export rather than assuming Steam used a fixed default path. Steam’s Game Recording announcement.
Find where Steam recordings are stored
Use View → Recordings & Screenshots to browse recordings and clips in Steam. To see or change the recording storage location and its space limit, open Steam → Settings → Game Recording. Keep these distinct:
- Temporary background footage: recent gameplay retained within the configured limit and subject to overwrite.
- Clips saved in Steam: clips kept in Steam’s recording library.
- Exported video: an MP4 written to the destination selected during export.
- Steam share link: a link for sharing a clip that may expire after two days.
Steam allows a user-selected recording location, so there is no single folder path that applies to every installation. Steam’s Game Recording announcement.
Rank #3

- Seamless Broadcasting and Versatile Streaming: Connect effortlessly to any app such as OBS, Streamlabs, Twitch Studio, Restream, Zoom, Teams, and stream flawlessly on various platforms like YouTube, Twitch, Discord, Facebook Gaming, etc., providing you with unparalleled flexibility and reach.
- Next-gen capture: Unleash the full potential of your content with cutting-edge 4K resolution, delivering crystal-clear visuals at an impressive 144 frames per second.
- HDMI 2.1 in/out: Elevate your recording capabilities with HDMI 2.1 support, allowing you to document high frame rates up to 240fps in glorious 1080p resolution for an unparalleled viewing experience.
- VRR passthrough: Immerse yourself completely in the gaming experience as our Variable Refresh Rate (VRR) passthrough ensures flawlessly smooth gameplay, eliminating screen tearing for an uninterrupted visual feast.
- Ultra-low latency: Stay in the moment with ultra-low latency powered by USB 3.2 Gen 2, ensuring your broadcast and gameplay remain perfectly synchronized, delivering an immersive and responsive streaming experience.
Capture game sound, chat and microphone audio
In Steam → Settings → Game Recording, review which audio sources are included. Depending on the controls available in your client, check game audio, system or application audio, voice chat and microphone input separately. Including system or other-application audio can also record sounds from a browser, music player or Discord that you did not intend to share.
- Choose the desired microphone and audio sources in Game Recording settings.
- Record a short test with the game sound and microphone active.
- Play the test clip and check that each source is audible and at a useful level.
- If a source is missing, check the selected input device, microphone permissions and whether the application is included. Also confirm that a USB or Bluetooth device did not change after recording started.
A brief playback test is more reliable than discovering a missing microphone track after a long session. Steam’s recording controls and captured-audio options are described in its Game Recording announcement.
What’s actually slowing this PC down?
Pick the symptom - the matching free tool is one click away.
Choose quality settings without overloading your PC
There is no single best resolution, frame rate, quality level or encoder for every game and computer. Higher resolution, frame rate and quality generally require more storage and can add encoding load. Hardware encoding, when available, can reduce CPU work, but recording still uses resources and can affect performance.
Rank #4
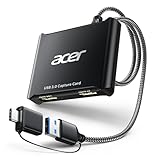
- 【4K Clarity, 1080P Performance】Enjoy stunning clarity with our USB 3.0 Video Capture Card—featuring 4K input and smooth 1080P@60Hz output. Featuring YUY2 technology, it delivers richer colors than MJPEG for lifelike live streaming and recording. Plus, it delivers high-quality video with minimal latency, making it perfect for gamers and content creators.
- 【Mic-in for Easy Commentary】Plug in a headset or mic directly to stream/record voice easily—no extra adapters. Great for real-time gaming commentary, online classes, or vlog dubbing. Paired with its low-latency tech, it keeps voice synced perfectly with video, eliminating post-editing hassle from mismatched audio-visuals. Fits most 3.5mm devices—ideal for gamers, teachers, creators.
- 【Plug and Play, no Extra-Drivers】No extra drivers or external power—just plug in and start capturing instantly. Small and lightweight, it fits easily in your bag for outdoor live streams, on-the-go recordings, or emergencies. Ideal for game capture, video conferences, and online teaching, it saves hassle while delivering smooth results.
- 【Wide Compatibility: Apps & Devices】No extra adapters—works flawlessly with your go-to platforms and gear. It pairs with streaming/recording apps like Twitter, YouTube, Facebook, OBS, XSplit, and VLC, plus devices including Switch/Switch2, PS5/PS4, Xbox, DSLR cameras, PC, macOS, and Android. Whether gaming, streaming, or hosting video calls, it keeps HD quality intact, eliminating "compatibility headaches".
- 【Worry-Free After-Sales Support】We are committed to delivering exceptional quality products that combine sophisticated design with affordable pricing, offering you the best solutions for seamlessly connecting your work and life. Whether you're a newcomer or a seasoned user, feel free to reach out anytime with any questions—your satisfaction is our top priority.
- Start with settings your PC can sustain while the game is running; make a short test at the quality you plan to use.
- If you notice stutter or recording interruptions, reduce quality, resolution or frame rate and test again.
- Use hardware encoding if Steam offers it for your system and it performs well in your test.
- Set a deliberate storage limit for background recording and leave enough free space on the selected drive.
- Prefer a drive with adequate capacity and throughput over an almost-full or slow drive.
Steam’s available quality and encoder choices can vary by hardware and client version, so use the settings exposed on your PC rather than assuming a particular bitrate or frame rate is universally appropriate. Steam’s recording guide.
Independent reader supportYour contribution helps us test, update, and keep practical guides available for everyone.Troubleshoot Steam Game Recording
The Game Recording setting is missing
- Restart Steam and install any available Steam client update.
- Check the desktop client at Steam → Settings → Game Recording, not only the in-game Overlay.
- Confirm the game is launched through your Steam Library, and test another Steam game.
- Check that the Steam Overlay is enabled if you are trying to access controls in-game.
- If the option remains unavailable, use an alternative recorder below.
Steam records nothing
- Confirm the mode is not set to Off/Don’t record. For manual mode, verify the shortcut displayed in settings.
- Check that Shift + Tab opens the Steam Overlay and that the game is running through Steam.
- Check the configured storage limit and available disk space.
- If the game or launcher runs with unusual elevated permissions, test launching it normally through Steam.
- Temporarily disable competing overlays or recorders and test again. Capture behavior can vary by game, rendering mode and anti-cheat system; that does not mean every anti-cheat blocks recording.
The video is black or the game is not captured
- Restart Steam and the game, then test borderless-windowed mode if the game offers it.
- Update the graphics driver and temporarily disable competing overlays or recorders.
- On a laptop with integrated and discrete graphics, check that the game and capture application use the intended GPU. OBS documents that a multi-GPU selection mismatch can interfere with Game Capture. OBS’s GPU selection guide.
- If Steam still cannot capture the game, test Xbox Game Bar or OBS. Different games and rendering modes can behave differently.
Game audio or microphone audio is missing
- Check game, application/system, voice-chat and microphone settings individually.
- Confirm the selected microphone and Windows microphone permission, then make another short test.
- Check whether a USB or Bluetooth audio device changed during the session.
Recording causes stutter or stops unexpectedly
- Turn off other recorders and overlays temporarily; multiple applications can compete for encoding capacity.
- Disable background recording if you only need manual sessions.
- Reduce recording quality, resolution or frame rate, and use hardware encoding if available.
- Check free space and record to a drive with adequate capacity and throughput.
Competing recorders can matter in particular when OBS needs a hardware encoder: OBS notes that Game DVR or NVIDIA’s recorder can consume NVENC sessions and prevent OBS from recording or streaming. OBS’s Windows gaming-features troubleshooting.
You cannot find an MP4
Steam does not necessarily turn the timeline or temporary footage into a standalone video automatically. In View → Recordings & Screenshots, select the wanted timeline range, create a clip, choose Save/Share → Export Video File, and confirm where it is saved. Steam’s Game Recording announcement.
Recommended Free Tools
Quick Recap
Alternatives to Steam Game Recording
| Recorder | Best fit | Controls and output | Trade-offs |
|---|---|---|---|
| Steam Game Recording | Clips or sessions from games launched through Steam, with minimal setup. | Background or manual recording; clips can be exported as MP4. | Not a general desktop recorder; capture can vary by game and configuration. Steam Game Recording. |
| Xbox Game Bar | Quick recordings of a game or app using a Windows-integrated tool. | Win + Alt + R starts/stops recording; Win + Alt + M toggles the microphone; Win + G opens Game Bar. Microsoft says recordings save as MP4 under Videos → Captures. Microsoft’s Game Bar recording instructions. | Less flexible than OBS for scenes, detailed audio routing and streaming; not a blanket solution for every desktop capture need. Microsoft’s Game Bar overview. |
| OBS Studio | Full sessions, streaming, webcam overlays, multiple sources and audio tracks. | Free, open-source software with configurable scenes and sources. Its listed Windows minimum is Windows 10 20H2 64-bit; Windows 11 is listed as recommended. OBS Steam listing and OBS official site. | Requires more setup; Game Capture may have multi-GPU issues, and competing recorders can use encoder capacity. GPU selection guide. |
| NVIDIA capture | Owners of supported NVIDIA GPUs who want vendor-integrated recording or instant replay. | Eligibility and available controls depend on current NVIDIA hardware and software. NVIDIA ShadowPlay. | Requires compatible NVIDIA hardware/software; exact application labels and features can change. |
| AMD Software recording | Owners of supported Radeon GPUs who want GPU-vendor-integrated recording. | Controls and availability depend on the current AMD Software release and supported hardware. AMD gaming media technology. | Requires supported AMD hardware/software; controls can vary by release. |
Which recorder should you use?
- For a highlight you might notice only afterward: Steam background recording or a GPU recorder’s instant-replay feature.
- For a planned Steam game session: Steam manual recording is the simpler starting point; use OBS if you need more control.
- For a game or app outside Steam: Try Xbox Game Bar for a straightforward capture, or OBS if you need broader source and scene controls.
- For a webcam, multiple sources or streaming: OBS offers the most control, at the cost of more setup.
- For vendor-integrated capture: Use NVIDIA or AMD recording if your hardware supports it and its current software fits your needs.
Product prices and availability are accurate as of the date/time indicated and are subject to change. Any price and availability information displayed on Amazon at the time of purchase will apply.