The Tool Desk
Outbyte PC Repair FREEClear out junk files and repair common Windows errorsFree Scan →Outbyte Driver Updater FREEScan for outdated or missing drivers - takes under a minuteDriver Scan →The right way to connect a Wii depends on the inputs on your television. Use a Wii AV cable for yellow, white, and red composite sockets; a Wii component cable for green, blue, red, white, and red sockets; or an active Wii-to-HDMI adapter or converter when the TV has HDMI only.
There is one crucial distinction: a Wii U connects directly by HDMI, but the original Wii does not. Any HDMI setup for the original Wii converts its analog video signal. The Wii mini has an additional limitation: Nintendo says it is compatible only with Wii AV cables.
First, identify your Nintendo console
Look at the console before buying a cable:
- Original Wii: Uses an AV Multi Out connector and supports Wii AV cables, component cables, and some third-party HDMI or S-Video solutions.
- Wii mini: Nintendo’s component-connection guidance limits it to Wii AV cables. Do not assume that an original Wii component or HDMI accessory will work with it. See Nintendo’s component-connection guide.
- Wii U: This is a different console and has native HDMI output. Follow Nintendo’s Wii U television guide, not an original Wii guide.
Nintendo explicitly says the original Wii is not compatible with HDMI cables. Its output is standard-definition analog video, even when a third-party product advertises “HD” or “1080p.” Such a product is converting or scaling the signal; it is not giving the Wii native high-definition output.
For the original Wii, Nintendo recommends component video when a compatible television supports it. See Nintendo’s HDMI compatibility guidance.
Do these 3 things before closing this tab:
1Repair Windows errors before they cause bigger problems2Scan for outdated or missing drivers - takes under a minute3Clear out junk files and repair common Windows errors#1 Best Overall

- STABLE WII TO HDMI CONVERSION: Convert your Wii or Wii U audio and video signal to HDMI for modern HDTVs, monitors and projectors. Designed for stable signal transmission and synchronized sound and picture, it works with 720p and 1080p HDMI displays while preserving the console’s original image quality.
- SIMPLE PLUG-AND-PLAY SETUP: No drivers, software, settings or external power required. Connect the adapter to your console, attach an HDMI cable, select the correct HDMI input on your display and start playing. For the most reliable connection, plug the adapter directly into the TV, monitor or projector rather than an HDMI switch or splitter.
- HDMI AUDIO PLUS 3.5MM AUDIO JACK: Audio is transmitted through the HDMI connection, while the built-in 3.5mm audio output lets you connect headphones, a headset or external speakers. Enjoy private late-night gaming or send the sound directly to your preferred audio device.
- SUPPORTS STANDARD WII DISPLAY MODES: Compatible with NTSC 480i, 480p and PAL 576i display modes. Some newer TVs and monitors may not accept certain 240p or 480i game signals through HDMI; if no picture appears, set the Wii display resolution to 480p when the game and console support it.
- COMPACT DESIGN & CLEAR COMPATIBILITY: Measuring approximately 6 × 3 × 1.9 cm, the compact adapter connects neatly behind the console without taking up desk space or adding tangled cables. Compatible with Wii and Wii U consoles using the Wii AV output connection; not compatible with Wii Mini. If you experience no picture, no sound or abnormal display lines, contact customer support for troubleshooting or replacement assistance.
Next, check the TV’s inputs
Look at the back, side, or front of the television. You need to connect to sockets labeled Input or In, not Output or Out.
| TV input | What you need |
|---|---|
| Yellow, white, and red | Wii AV/composite cable |
| Green Y, blue Pb/Cb, red Pr/Cr, plus white and red audio | Wii component cable |
| Round S-Video socket plus white/red audio | Wii-compatible S-Video cable and audio connections |
| HDMI only | Wii-specific HDMI adapter, or component cable plus an active component-to-HDMI converter |
| RF/coaxial only | Additional legacy equipment; this is not the normal Wii setup |
Some modern TVs hide composite inputs behind a flap or provide them through a manufacturer-specific 3.5-mm breakout adapter. Use the adapter supplied with the TV. Generic 3.5-mm AV cables can have different pin arrangements and may not work.
Option 1: Connect the Wii with composite AV
This is the simplest method and is also the normal choice for a Wii mini.
You need
- An original Wii AV cable or compatible replacement. Nintendo identifies its original cable as model RVL-009.
- A TV with composite video and audio inputs.
- The Wii AC adapter and Sensor Bar.
Steps
- Turn off the TV and Wii.
- Insert the rectangular plug into the Wii’s AV Multi Out port on the back of the console.
- Connect the yellow plug to the TV’s video input.
- Connect the white plug to left audio or mono, and the red plug to right audio.
- Plug the Sensor Bar into the Sensor Bar port.
- Connect the Wii AC adapter and switch on the console.
- Turn on the television and press its Input, Source, AV, Video, or EXT button.
- Select the input containing the yellow, white, and red plugs. The Wii safety screen or Wii Menu should appear.
Nintendo’s Wii setup manual shows this AV Multi Out and RCA connection method.
Windows Errors? Fix Them Before They Spread
Repair common Windows errors and clear accumulated junk for a smoother, more stable PC - no reinstall needed.Free scan · no reinstallCrashes, No Sound, or Screen Glitches?
Random freezes, missing sound and display glitches usually trace back to one bad driver. Find and replace yours safely.Free scan · under a minuteComposite is inexpensive and widely compatible, but it normally produces the softest picture. On a large modern screen, text and edges may look noticeably blurred.
Rank #2
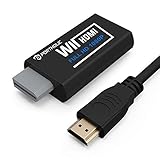
- Buy with Confidence: If you receive a defective one (like wavy lines, no sound/picture) or you have any problems with the adapter, please contact us in the first place to get efficient customer service for replacement or other assistance.
- NOTE: Some devices’ auto-setting of screen resolution is 480i instead of 480p, which may not support games at 240p/480i over HDMI. If you switch to 480p mode they may work over HDMI. it can't be connected to the switch/splitter, only connect directly to the TV, monitor, projector. This adapter not support for Wii Mini
- Extra Audio Jack: Although HDMI output provides audio output, an extra 3.5mm audio jack allows you to connect a speaker or headphone. Even the night owls can enjoy playing in the midnight and no need to worry about disturbing others.
- Plug and Play: Super easy to operate. No setting and no need to install the drivers. Just simply hook it up the Wii and plug the HDMI directly into the monitor and BOOM enjoying the games with optimal viewing.
- Small in Size: PORTHOLIC Wii to HDMI Adapter with size of 6 x 3 x 1.9cm, is smaller than a Zippo. Small but powerful. It does not occupy any space on your table by hooking up the back of Wii. No more tangling cords, just one cable.
Option 2: Connect with component video
Component is generally the best straightforward direct connection for an original Wii. It separates the video into three signals and can support 480p when the game, Wii settings, cable, and television all support it.
Recognize the five plugs
- Green: Y video
- Blue: Pb or Cb video
- Red video: Pr or Cr video
- White: left or mono audio
- Red audio: right audio
There are two red plugs. The red video plug goes into Pr/Cr; the red audio plug goes into the nearby right-audio socket. Do not put the audio plug into the red component-video input.
Steps
- Turn off the Wii and TV.
- Insert the cable’s console plug into the Wii’s Digital AV Out/AV Multi Out port.
- Connect green to Y, blue to Pb/Cb, and the red video plug to Pr/Cr.
- Connect white and red audio to the matching left and right audio inputs associated with the component input.
- Connect the Sensor Bar and AC adapter.
- Power on the Wii and select the television’s component input.
- If the Wii asks about progressive scan, select it only if the television accepts 480p.
The Wii supports 480i and 480p component output, but component inputs do not universally accept both modes. Nintendo warns that some TVs cannot accept 480i or 480p through their component inputs. Its Wii accessory documentation lists the relevant output details.
Component improves the connection quality; it does not make the Wii a high-definition console. Some games and software may not support progressive output.
Option 3: Connect an original Wii to an HDMI-only TV
An HDMI-only television requires an active conversion stage. A passive cable cannot turn the Wii’s analog output into HDMI.
Rank #3

- 【NOTE】Please set your HDTV to the corresponding HDMI input to avoid a black screen or malfunction. It is NOT COMPATIBLE with the WII MINI because the device only has an AV interface, but it does not have a Wii interface. Some devices' auto-setting of screen resolution is 480i instead of 480p, which may not support games at 240p/480i over HDMI. If you switch to 480p mode they may work over HDMI. it can't be connected to the switch/splitter, only connect directly to the TV, monitor, projector
- 【Reinforced Cable Design】This wii hdmi cable adapter features reinforced cables that prevent breakage and sheath damage, ensuring longer durability. Multi-layer shielding enhances interference resistance for a more stable signal, reducing flickering, blackouts, and frame drops. It also has better heat resistance and is less prone to burnout
- 【HD Output Compatibility】This Wii to HDMI converter supports 1080P full HD output(CANNOT IMPROVE IMAGE QUALITY), allowing you to connect your Wii console to any HDMI-compatible device, such as HDTVs, monitors, and projectors, providing clear, lossless video and audio quality
- 【Full Support for All Wii Display Modes】The converter supports all Wii display modes, including NTSC 480i, 480p, and PAL 576i. Whether you're playing in standard resolution or high definition, it ensures the best gaming experience
- 【Plug and Play】The wii to hdmi cable is designed for simplicity, fully supporting plug-and-play functionality with no additional drivers or complex settings required. Simply connect your Wii console to your HDMI device and start gaming immediately
Wii-specific HDMI adapter
A Wii-specific adapter plugs into the AV Multi Out port and provides an HDMI socket:
Wii → Wii-specific HDMI adapter → HDMI cable → TV- Insert the adapter fully into the Wii’s AV Multi Out port.
- Connect an HDMI cable from the adapter to the TV.
- Turn on the Wii and select the matching HDMI input.
- If there is no picture, try another HDMI port and reseat the adapter.
These products are third-party accessories, not official Nintendo HDMI cables. Quality, scaling, audio handling, compatibility, and reliability vary. For example, the Hyperkin HD Cable for Wii was listed at $29.99 on its vendor page in the August 2026 source check, although availability and price can change and the page showed a sold-out status at that time.
What’s actually slowing this PC down?
Pick the symptom - the matching free tool is one click away.
Choose this route when convenience and a small number of boxes matter more than advanced video processing. Do not interpret “HD cable” as proof that the Wii produces a native 1080p or 4K image.
Wii component cable plus HDMI converter
This is a more modular HDMI setup:
Wii → Wii component cable → component-to-HDMI converter → HDMI cable → TV- Connect the component cable to the Wii.
- Connect green, blue, and red video plugs to the converter’s Y, Pb, and Pr inputs.
- Connect the white and red audio plugs to the converter’s audio inputs.
- Connect HDMI from the converter to the TV.
- Connect the converter’s USB power cable if it requires one.
- Select the converter’s HDMI input on the television.
This approach preserves the better component connection and lets you replace the cable or converter independently. It also avoids the common mistake of buying a cheap composite-to-HDMI box and expecting it to perform like component conversion. A composite-to-HDMI converter starts with the Wii’s lower-quality yellow-video signal.
Dedicated retro scaler
A retro video processor can accept composite, S-Video, or component and output a display-compatible digital signal. This makes sense for owners of several retro consoles or for anyone who cares about deinterlacing, scaling, filtering, and latency.
Rank #4

- Input: RCA, Output: HDMI; Converts Analog Composite Input to HDMI 1080p or 720p Output.
- RCA to HDMI Converter - Plug and Play, Easy to Install and Operate, Powered by External USB Cable.
- RCA to HDMI Converter supports connecting HDMI capture card (note that we do not include HDMI capture card).
- Composite to HDMI Converter Widely Applied to PS One, PS2, PS3, N64, WII, WII U, STB, VHS, VCR, Blue-Ray DVD Players Projector (Note: It can only be used when PS2 is set to RGB output).
- AV to HDMI Converter Support PAL, NTSC3.58, NTSC4.43, SECAM, PAL/M, PAL/N tv format.
Be careful about model compatibility. The RetroTINK-2X Pro accepts component, S-Video, and composite standard-definition formats, but its manufacturer states that 480p and higher inputs do not work. Therefore it is not automatically the right choice for a Wii configured for 480p. The page listed a $139.99 price in the August 2026 source check; prices can change.
Recommended Free Tools
More advanced RetroTINK models support broader use cases, but their prices—listed in the source material at about $325 for the 5X Pro, $475 for the 4K CE, and $750 for the 4K Pro—make them enthusiast purchases rather than sensible default options for one casually used Wii. See the manufacturer’s current catalog for current specifications and prices.
Independent reader supportYour contribution helps us test, update, and keep practical guides available for everyone.Connecting a Wii to a monitor or projector
A monitor with HDMI can use the same active adapter or converter as an HDMI television. Many computer monitors do not accept composite, S-Video, or component directly, and some do not handle the Wii’s 480i signal correctly.
Monitors may also have no speakers, so audio may need to come from the converter’s analog output, external speakers, or a separate audio system. A projector can add its own processing delay, particularly in non-game display modes.
Nintendo notes that a computer TV card with the appropriate inputs may work, while direct VGA or DVI solutions are third-party options. Its monitor-connectivity guidance explains these limitations.
Quick wins for a faster PC:
Clear out junk files and repair common Windows errorsFree Scan →Fix the driver behind crashes, sound loss and screen glitchesFind Drivers →Repair Windows errors before they cause bigger problemsFix Now →Best Value

- Connect the WII console to any HDMI-compatible HD device, The single-cable design eliminates screen flickering caused by multiple connections and allows for plug-and-play operation
- A built-in converter chip provides synchronized audio and video output and supports all Wdisplay modes, including NTSC 480i, 480p, and PAL 576i. Not compatible with the WII Mini
- With a single-cable connection, plug and play, no setup required. Simply connect the dongle to the WII console, then plug the HDMI cable directly into your monitor or TV
- The 5ft/150cm cable length eliminates cable tangles and extends the distance between devices without taking up too much space
- Note: 1. This adapter only converts the signal, not improves the clarity. 2. It is not compatible with the Mini. 3. Some devices automatically set their resolution to 480i instead of 480p, so you may not be able to transmit 240p/480i signals via HDMI. You can try switching to 480p, which may solve the HDMI problem. 4. It cannot be connected to a switch or splitter, only to a TV/monitor/projector. 5. It does not have an external audio interface
Connect and position the Sensor Bar
The Sensor Bar does not carry video or audio. It provides the infrared reference used by Wii Remotes.
- Plug the Sensor Bar into the Wii.
- Place it centered above or below the screen.
- Set the Sensor Bar position correctly in the Wii settings if the pointer appears offset or behaves backwards.
- Replace the Wii Remote batteries and synchronize the remote if necessary.
The Wii can display a picture without the Sensor Bar, but many menus and games cannot be controlled normally without it. A missing or faulty Sensor Bar therefore does not usually explain a missing picture.
Troubleshooting
Black screen or “No Signal”
- Confirm that the TV is on the correct input.
- Check that every plug is connected to an Input/In, not an Output/Out.
- Reseat the Wii plug in the AV Multi Out port.
- For component, verify green-to-Y, blue-to-Pb/Cb, and red video-to-Pr/Cr.
- Confirm that the converter is powered by USB if required.
- Try another HDMI port.
- Temporarily remove splitters, receivers, capture devices, and switch boxes.
- Test the Wii with another cable or television.
- If the Wii was previously configured for a display mode the new TV cannot show, reconnect it to a compatible TV and change the setting, or use Nintendo’s video-reset procedure.
Replacing an HDMI cable alone cannot solve a setup with no HDMI conversion stage.
Picture but no sound
- Check the white and red audio plugs.
- On component, make sure the red audio plug is not in the red Pr/Cr socket.
- Confirm that the TV’s component input uses the nearby labeled audio sockets.
- With HDMI conversion, verify that the converter accepts analog audio as well as component video.
- Check mute, volume, and external-speaker settings.
Sound but no picture
- For composite, inspect the yellow plug and video input.
- For component, inspect all three video plugs.
- Some TVs share a green Y socket between composite and component. Change the TV’s input mode if necessary.
- Confirm that a powered converter is receiving the correct input type.
The picture is black and white
Common causes include a composite cable connected to component sockets, the TV being set to component while receiving composite, a PAL/NTSC or regional display-format mismatch, or incorrectly wired third-party cables. Settings alone cannot guarantee compatibility between every Wii and television combination.
The Wii works on a CRT but not a modern TV
Older CRT televisions are generally more tolerant of the Wii’s original analog timings. On a modern TV, try a Wii component cable with a compatible converter, a Wii-specific HDMI adapter, or a scaler designed for the Wii’s output formats.
Component input exists but fails
Check whether the television accepts the Wii’s selected 480i or 480p mode. Also verify that the TV’s component sockets are not actually part of a proprietary adapter system and that the red video plug is in Pr/Cr rather than audio-right.
The pointer does not work
Plug in and center the Sensor Bar, synchronize the Wii Remote, replace its batteries, and remove strong infrared sources such as direct sunlight, candles, or certain lamps. Then check the Sensor Bar position setting in Wii options.
Best connection by situation
| Situation | Best starting point |
|---|---|
| Older TV with yellow, white, and red inputs | Wii AV cable |
| TV with green, blue, and red component inputs | Wii component cable |
| Modern HDMI-only TV and simplest setup | Wii-specific HDMI adapter |
| HDMI-only TV and modular equipment | Wii component cable plus component-to-HDMI converter |
| Several retro consoles or demanding display requirements | Dedicated scaler with Wii-compatible inputs |
| Wii mini | Wii AV cable; add an active converter only if the TV lacks composite |
| HDMI computer monitor | Active converter or scaler, with separate audio if required |
Buying checklist
- Confirm whether the console is an original Wii, Wii mini, or Wii U.
- Identify the TV’s actual input type.
- For component, check support for 480i and 480p.
- Check whether the TV requires a proprietary composite breakout cable.
- Verify whether an HDMI converter requires USB power.
- Prefer a product with a return policy, since third-party adapters can behave differently with individual displays.
- Confirm whether the product supports component or only composite.
- For a Wii mini, prioritize a Wii AV cable rather than assuming component compatibility.
- Treat prices, stock, and “HD” claims as product-specific and changeable.
With a yellow/white/red TV, use composite. With component inputs, use component. With HDMI only, use an active Wii HDMI adapter or a component-to-HDMI converter. That is the complete decision: there is no single passive cable that connects an original Wii to every television.
Quick Recap
Product prices and availability are accurate as of the date/time indicated and are subject to change. Any price and availability information displayed on Amazon at the time of purchase will apply.



