Quick wins for a faster PC:
Clear out junk files and repair common Windows errorsFree Scan →Scan for outdated or missing drivers - takes under a minuteDriver Scan →For a Valve Index setup, plug each base station into power and aim it toward the play area; the Index headset connects to the PC separately. Start SteamVR, wait for the devices to show as ready, then follow Room Setup. You generally do not run a cable from each base station to the PC. Vive optical-sync settings and hardware compatibility depend on the station and headset generation, so check those before changing modes or mixing equipment.
Before connecting anything, check your headset and base-station generation
Base stations do not connect to a PC in the same way a headset does. They need power and suitable placement so tracked devices can see them. The headset connects to the computer separately. Before setup, identify whether you have an Index, an original HTC Vive, or a Vive Pro-family headset, and whether the stations are 1.0 or 2.0.
Compatibility is not universal: HTC-branded 1.0 stations and Valve-branded 2.0 stations cannot be mixed in the same setup. Index supports either station generation. Version 2.0 stations do not work with the original Vive headset or its Wand controllers, but they do work with the Vive Pro family. See Valve’s Index Base Station & Lighthouse Tracking compatibility guidance.
Set up the play area and position the stations
Choose a clear area
For room-scale Index, Valve recommends at least 2 m × 1.5 m (6.5 ft × 5 ft) of clear space. Remove obstacles from the area. Seated and standing setups need less room. The Valve Index Setup Guide explains the room-scale setup.
#1 Best Overall

- Includes One base station and one power adapter per order
- Fits standard threaded mounting points
- Cord: 8' 2'' L
- Compatible with Vive Pro, Vive Pro Eye, Vive Pro 2 and Vive Cosmos Elite headsets
Aim for coverage and visibility
Aim the stations toward the center of the play area, and arrange things so tracked devices can see at least one powered station. For the Vive systems covered by Valve’s setup guidance, stations should be above head height—at least 6.5 ft (2 m)—angled down 30–45 degrees, no more than 5 m (16 ft) apart, and able to see one another without obstruction. Treat these as Valve recommendations for the documented systems, not universal requirements for every room or base-station generation. See Valve’s SteamVR FAQ and Index setup instructions.
Valve recommends two stations for most room-scale spaces. One can be sufficient for seated or standing use; two reduce the chance that a device will lose sight of the stations. You can use the included wall mounts, a tripod or light stand with a standard ¼-inch UNC mount, a braced floor-to-ceiling pole with clamps, or a stable high shelf. A separate mount is optional if your setup is already stable and well positioned. Valve’s SteamVR FAQ describes alternatives; its wall-mount instructions list a Phillips-head screwdriver and a drill with a ¼-inch or 6 mm bit.
Rank #2

- Includes One base station, one power adapter, and one power cable
- Fits standard threaded mounting points
- Power cable: 8' 2'' (2.5m) L
- Stand and mounting hardware not included
- Compatible with VIVE, VIVE Pro, VIVE Pro Eye and VIVE Cosmos Elite headsets
Power the stations and connect the headset
- Power each base station. Plug each station into an outlet and make sure its front indicator is visible. Remove any protective film from the station lenses before use.
- Connect the headset to the PC. For Index, connect the headset’s DisplayPort and USB plugs to the PC as directed by Valve, and connect its power supply to an outlet. The base stations’ basic setup does not require running a cable from each one to the PC.
- Start SteamVR. Check the SteamVR status window. When the devices show as ready, follow the on-screen Room Setup steps.
Valve’s Index Setup Guide covers the headset connections, station power and positioning, SteamVR launch, and Room Setup.
Use synchronization settings only when your Vive setup calls for them
Do not assume one synchronization method applies to every generation or configuration. For the Vive optical-sync troubleshooting configuration documented by Valve, set one station to mode b and the other to mode c, and ensure the stations can see one another. Valve says to look for solid-green station lights in that documented setup. This b/c pairing is not universal advice for every station generation or cabled-sync arrangement. Follow the hardware-specific instructions for your configuration. See Valve’s SteamVR Tracking Troubleshooting instructions.
Do these 3 things before closing this tab:
1Repair Windows errors before they cause bigger problems2Fix the driver behind crashes, sound loss and screen glitches3Clear out junk files and repair common Windows errorsRank #3
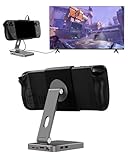
- 2-in-1 Magnetic TV Dock & Stand for Steam Deck: Exclusively designed for Steam Deck and Steam Deck OLED. (Note: 1.AC Adapter NOT included; Please use official AC Adapter. 2.The included cable is designed only for connecting this dock to Steam Deck.) Please enjoy this innovative full-featured TV dock with a magnetic stand function.
- 4K HDMI TV Output – Plug & Play: Connect your Steam Deck to a TV or monitor via HDMI for smooth, low-latency gameplay on the big screen. TV output is automatically enabled when an HDMI cable is connected, with no buttons or manual switching required. Supports up to 4K@120Hz output (Steam Deck supports up to 4K@60Hz) for a sharp and immersive gaming experience.
- 6-in-1 Multi-Function Hub: Expand your device with 4K@120Hz HDMI, 100W USB-C PD charging, 1000Mbps Gigabit Ethernet, and 2×USB 3.0 ports. Enjoy stable wired internet, fast data transfer, and reliable power delivery—all in one compact steam deck docking station.
- Magnetic Stand for Comfortable Gaming & Controller Play: Attach the magnetic back clip to your Steam Deck and enjoy hands-free gaming at the perfect angle. Ideal for tabletop mode, controller play, or long gaming sessions without holding the console. The magnetic design keeps ports and vents unobstructed for proper cooling. Note: Not compatible with protective cases.
- Foldable, Adjustable & Compatible with iPhone 12–17: Features a 270° adjustable, foldable aluminum alloy stand that supports both landscape and portrait modes. Also compatible with MagSafe-enabled iPhone 12–17 models, making it a versatile magnetic stand for gaming, streaming, or daily use. Portable design fits easily into backpacks for travel.
Fix channel conflicts or intermittent tracking
Change channels if SteamVR reports a conflict
Channel changes are not a required step for every installation. If SteamVR reports a conflict, open SteamVR status > Devices > Base Station Settings > Configure Base Station Channels. Try automatic configuration first, or assign distinct channels manually. Valve says stations packaged in kits are set to channels 1 and 2, while individually purchased stations are set to channels 3–16; extra stations or nearby play areas can make channel changes necessary. Consult Valve’s channel configuration guidance.
Check visibility, power, and station status
- Confirm each station is powered and that tracked devices can see at least one station. Check for obstructions between the stations and the play area.
- For the documented Vive setup, check whether the station indicators are solid green and whether SteamVR offers a firmware update.
- If tracking pulses, drifts, or one station appears not to work, test the stations individually in A mode while facing each one, as Valve describes. Check the outlet by swapping stations before concluding that a station has failed.
- Reflective surfaces can contribute to tracking problems in some environments; remove or cover them if the issue persists.
- Check that the headset’s PC connections are secure if the headset itself is not detected.
These checks follow Valve’s SteamVR Tracking Troubleshooting guidance.
Quick Recap
Rank #4

- VR0572 Japan Authorized Distributor Product, Manufacturer Direct Warranty 1 Year
- Base station for SteamVR 2.0 Recommended for upgrading from the 1.0 environment or adding to a 2.0 environment
- The room scale VR is recommended to use at least 2 base stations. We recommend buying 2 or more when purchasing new models to improve functionality with the inside out format HMD
- Multiple uses for more precise tracking. With 4 units of maximum configuration, you can build a 10m x 10m room scale
- This product should be used with 2.0 standard base stations (with additional setup) and controllers. (It is not compatible with the 1.0 standard products at the same time or mixing)
Product prices and availability are accurate as of the date/time indicated and are subject to change. Any price and availability information displayed on Amazon at the time of purchase will apply.



