
Sometimes, but not reliably. Nintendo says calibrating a Switch control stick may improve unintended movement; it does not promise to repair every drifting Joy-Con. Update the console first, run the model-appropriate troubleshooting steps, and send the affected controller to Nintendo for inspection and repair if the movement continues.
What “fixing drift” means in this case
Joy-Con drift is the familiar symptom in which a character, cursor, camera or menu moves while you are not touching the stick. Nintendo’s support wording is deliberately cautious: calibration may improve the problem. That is different from saying calibration permanently repairs a worn, contaminated or otherwise damaged stick.
| # | Preview | Product | Price | |
|---|---|---|---|---|
| 1 |

|
Nintendo Joy-Con (L/R) - Neon Red/Neon Blue | $88.99 | Buy on Amazon |
| 2 |

|
Nintendo Joy-Con (L/R) - Neon Red/Neon Blue (Renewed) | $60.00 | Buy on Amazon |
| 3 |
|
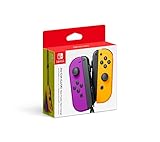
Nintendo Neon Purple/Neon Orange Joy-Con (L-R) - Switch | $87.95 | Buy on Amazon |
As an Amazon Associate I earn from qualifying purchases.
Calibration is therefore a sensible first test, not a guarantee. If the console has learned an incorrect neutral position or the symptom is caused by a temporary connection problem, the procedure can make the control behave normally again. If the underlying fault remains, the movement will return or never disappear.
Do these 3 things before closing this tab:
1Scan for outdated or missing drivers - takes under a minute2Repair Windows errors before they cause bigger problems3Fix the driver behind crashes, sound loss and screen glitchesNintendo’s current Switch-family troubleshooting Q&A also gives a clear endpoint: when the listed steps do not improve the symptom, send the controller to a Nintendo service center for inspection and repair. For a detachable Joy-Con problem, Nintendo says the console itself does not need to be sent.
#1 Best Overall
- Introducing Joy-Con, controllers that make new kinds of gaming possible, for use with Nintendo Switch.
- The versatile Joy-Con offer multiple surprising new ways for players to have fun.
- Two Joy-Con can be used independently in each hand, or together as one game controller when attached to the Joy-Con grip.
- They can also attach to the main console for use in handheld mode, or be shared with friends to enjoy two-player action in supported games.
- Each Joy-Con has a full set of buttons and can act as a standalone controller, and each includes an accelerometer and gyro-sensor, making independent left and right motion control possible.
Do these checks in Nintendo’s recommended order
- Update the console. Nintendo places a system-software update before the other listed troubleshooting actions. Complete the update, restart if the console requests it, and then test the stick again.
- Interrupt and restore the controller connection. If the movement could be a temporary connection issue, briefly press the affected controller’s Sync button several times. This interrupts the connection. Press a face button afterward to reconnect the controller.
- Calibrate the stick. Open the console’s controller settings, select the option for calibrating control sticks, and follow every on-screen instruction. Keep your hand off the stick when the instructions ask for a neutral position.
- Re-register the controller if necessary. Use the console’s controller-management options to register the affected Joy-Con again, then test it in the same game or menu where the problem appeared.
- Compare attached and wireless use. With a detachable Joy-Con, test it while attached to the console and again wirelessly. A fault that appears only during wireless use points you toward connection or interference checks before you assume the stick itself is damaged.
- Arrange service if the symptom persists. Nintendo’s documented next step is inspection and repair at a Nintendo service center.
The precise wording of menu items can differ between Switch-family models and software versions, so use the controller-settings screen shown by your console rather than selecting an unrelated calibration tool.
How to calibrate a detachable Joy-Con
1. Prepare a useful test
Use a game or menu in which unintended movement is easy to see. A character that slowly walks, a camera that pans, or a menu selection that drifts is more informative than a brief visual change. Remove your thumb completely from the stick before judging the result.
2. Open controller settings
From the HOME Menu, go to the console’s system settings and open the controller-related section. Choose the stick-calibration command supplied for your controller. If the console asks you to choose a stick, select the one that is moving by itself.
Free tools Windows power users keep installed
One-click scans. No signup required.
3. Follow the neutral-position instruction
When the calibration screen asks you to leave the stick alone, do exactly that. Do not hold the stick against an edge unless the screen specifically asks you to move it there. The console needs an untouched reference position to compare with later input.
4. Complete the movement prompts
Follow the displayed directions for moving the stick. Do not skip a prompt or substitute a different motion. When calibration finishes, return to the game or input test and check whether the unwanted movement has improved.
5. Treat the result as evidence, not a warranty
If the character or cursor stops moving, continue testing for a few minutes and in another game or menu. A temporary improvement is useful information, but Nintendo’s wording remains “may improve”; it does not establish that the hardware has been repaired. If the same movement returns, continue with the remaining troubleshooting steps rather than repeatedly recalibrating indefinitely.
When the Sync-button step is more relevant than calibration
A controller can behave incorrectly because its wireless connection was interrupted or unstable. Nintendo recommends briefly pressing the Joy-Con’s Sync button several times to interrupt the connection, then pressing a face button to reconnect it. This is a connection reset, not a stick repair.
Recommended Free Tools
Compare the symptom before and after the reset. If the movement disappears and does not return, the original event may have been temporary. If the stick still moves with the controller attached to the console, or the behavior returns in both modes, calibration and service become more relevant than repeating the connection reset.
Use attached-versus-wireless testing to narrow the cause
| What you observe | What it suggests | Next action |
|---|---|---|
| Movement occurs both attached and wirelessly | The symptom is not limited to the wireless link; a stick-input problem remains possible. | Update, calibrate, re-register if needed, then seek Nintendo inspection if it persists. |
| Movement occurs only when the Joy-Con is wireless | The setup or radio connection may be contributing. | Check for nearby interference, a metal rack, or an unlicensed cover; then retest. |
| Movement occurs only while attached | The attached configuration needs its own test; the available evidence does not identify a single cause. | Repeat the software and calibration steps, then use Nintendo service if the symptom remains. |
| Movement stops after calibration | Calibration improved the reported behavior. | Monitor the controller in more than one game; return to service guidance if it comes back. |
| Movement continues after all listed steps | Nintendo’s troubleshooting path has reached its service recommendation. | Send the affected controller for inspection and repair. |
Wireless-only behavior is important because it prevents an automatic conclusion that the analog stick is physically defective. Nintendo specifically calls out nearby interference, a metal rack and an unlicensed cover as things to check in that situation.
Check the physical setup before blaming the stick
Nearby interference
Move the console and controller away from possible sources of wireless interference and test again. Keep the test simple: use the same game, the same controller and a clear position so that you change one condition at a time.
A metal rack or enclosure
Nintendo’s troubleshooting guidance specifically names a metal rack as a possible factor when the problem occurs only wirelessly. Temporarily move the console or controller away from the rack and repeat the test.
Quick wins for a faster PC:
Repair Windows errors before they cause bigger problemsFix Now →Scan for outdated or missing drivers - takes under a minuteDriver Scan →Clear out junk files and repair common Windows errorsFree Scan →An unlicensed cover
Remove an unlicensed cover from the affected controller or console setup and test again. If the symptom changes only after the cover is removed, leave it off while you complete the remaining checks.
Re-registering the controller: when and why
Re-registering is useful when the console’s record of the controller connection may be involved. It is not presented by Nintendo as a guaranteed cure for mechanical drift. Use the controller-management options on the console to remove and register the affected Joy-Con according to the on-screen instructions.
After registration, test the controller in both configurations that matter to you: attached and wireless. Record whether the symptom appears immediately, only after a period of play, or only in one mode. That distinction gives Nintendo’s service team more useful information if you need to send the controller in.
Switch Lite requires a different decision
Switch Lite has an integrated control stick rather than detachable Joy-Con controllers. Its stick therefore cannot be removed from the console for a separate wireless-versus-attached comparison.
Nintendo provides a separate procedure for the built-in Switch Lite stick. Follow the calibration and troubleshooting instructions for that integrated control, not the detachable-Joy-Con procedure. If the built-in stick remains faulty, Nintendo lists the Switch Lite console itself as the item to send for service.
Rank #3
- Two Joy Con can be used independently in each hand, or together as 1 game controller when attached to the Joy Con grip
- They can also attach to the main console for use in handheld mode, or be shared with friends to enjoy two player action in supported games
- Each Joy Con has a full set of buttons and can act as a standalone controller, and each includes an accelerometer and gyro sensor, making independent left and right motion control possible
| System or controller | What to test | What is sent for service when the issue persists |
|---|---|---|
| Detachable Joy-Con | Update, Sync-button reset, calibration, re-registration, and attached-versus-wireless comparison. | The affected controller; Nintendo says the console does not need to be sent for a Joy-Con controller problem. |
| Switch Lite integrated stick | The separate built-in-stick procedure and calibration instructions for Switch Lite. | The Switch Lite console itself, because the stick is integrated. |
What calibration can and cannot tell you
What a successful result tells you
A successful result tells you that the console’s calibration process improved the input it was receiving. It does not identify the exact cause, provide a repair guarantee, or prove that the controller will remain drift-free.
What an unsuccessful result tells you
If the stick still moves by itself after the update, connection reset, calibration and relevant setup checks, Nintendo’s own guidance points to inspection and repair. Continuing to repeat the same calibration screen is not a substitute for that service step.
What the official guidance does not establish
Nintendo’s support material does not provide a drift prevalence rate, a calibration success rate, a repair price, warranty terms, or a turnaround time. Those figures vary by region, model, date and service policy, so they should not be inferred from the calibration instructions.
A practical decision tree
- Is the console software current? If not, update it before judging the controller.
- Does the symptom look like a temporary connection problem? Press the Sync button several times, reconnect with a face button and retest.
- Does calibration improve the movement? If yes, test again in another context and monitor it. If no, continue.
- Is the affected control detachable? For a Joy-Con, compare attached and wireless use. For Switch Lite, use the integrated-stick procedure.
- Does the fault occur only wirelessly? Check interference, a metal rack and an unlicensed cover.
- Does the fault remain? Re-register the controller if relevant, then send the affected hardware to Nintendo for inspection and repair.
Should you replace a Joy-Con instead?
Replacement is a choice you can consider after the official troubleshooting path, but Nintendo’s documented recommendation for a persistent symptom is service inspection and repair. If you purchase a replacement detachable Joy-Con, confirm that it matches your Switch-family model and that the listing is available in your region.
A third-party analog-stick part or repair kit is a separate, do-it-yourself path. Nintendo’s cited guidance does not recommend disassembly, name a replacement part, or establish that replacing a stick will resolve a particular case. Treat such work as an unsupported repair decision, not as a Nintendo-endorsed calibration step.
How to describe the problem to support
Before sending hardware, write down the details that distinguish a stick problem from a connection problem:
- Which controller or integrated stick is affected.
- Whether the movement happens with your hand completely off the stick.
- Whether it occurs attached, wirelessly, or in both modes.
- Whether updating, pressing Sync, calibrating and re-registering changed anything.
- Whether removing a nearby metal rack or unlicensed cover changed the symptom.
- Which game or menu makes the movement easiest to reproduce.
For a detachable Joy-Con, send the controller Nintendo identifies as affected rather than automatically shipping the console. For a Switch Lite integrated-stick problem, follow Nintendo’s instruction for sending the console itself.
What’s actually slowing this PC down?
Pick the symptom - the matching free tool is one click away.
Bottom line for the original question
Calibrating a Joy-Con can improve drift, and it is worth trying after updating the console. It is not a guaranteed fix and should not be treated as proof that damaged hardware has been repaired. Use the result to decide what to do next: investigate wireless-only symptoms and setup conditions, or send the persistent problem to Nintendo for inspection and repair.
Quick Recap
Product prices and availability are accurate as of the date/time indicated and are subject to change. Any price and availability information displayed on Amazon at the time of purchase will apply.

