A safe, dependable STEAM lab needs more than labeled shelves: it needs a documented system for knowing what equipment is on hand, who may use it, whether it is fit for use, and what happens when it is damaged. Build that system around your school’s and district’s rules, each manufacturer’s instructions, and the hazards actually present in your room. Not every STEAM lab contains chemicals, biological materials, power tools, or 3D printers, so controls should match the equipment and activity.
Start with a practical equipment register
Create one shared register for equipment and safety equipment. Its purpose is to help staff locate items and track their condition and upkeep—not to satisfy a universal form requirement. OSHA’s laboratory recommendations identify regular inspection and maintenance as essential to a safety program: OSHA Appendix A to 29 CFR 1910.1450.
For each item, record:
- Asset or item name, including a model or serial number when useful.
- Location, such as a cabinet, storage zone, or designated work area.
- Responsible person for checks, records, and follow-up.
- Condition and status: ready to use, restricted, or out of service.
- Manual or procedure, with a link or clear location for the manufacturer’s instructions.
- Required training and controls, including task-specific PPE or supervision.
- Last inspection date, next scheduled service or check, and any applicable calibration date.
- Repair status, including the reported problem, date, and who is handling it.
Keep the register accessible to authorized staff and update it when equipment moves, is repaired, or leaves service. Record safety equipment too, including its location and relevant inspection or monitoring dates.
Use clear status labels and control access
Choose status labels and access rules through district-approved procedures. Make the meaning of each label clear to students and staff, and keep status current.
#1 Best Overall

- Steam autoclavable at 121 degreeC (250 degreeF)
- Polypropylene trays have smooth, rounded corners for easy cleaning and sterilization
- Cover fits snugly onto the tray and allow stacking
- Measures inside dimensions: 11-1/2" length by 6-5/8" width by 3-1/4" height
- Ready to use: available to people who have the required training and permission, following the applicable procedure.
- Restricted: use only with specified authorization, supervision, or additional controls. Students should not operate restricted equipment unless they meet those conditions.
- Out of service: do not use pending assessment or repair. Prevent access in the way your school’s procedure requires, and document the issue.
A label does not make defective equipment safe. If a guard is missing, a tool behaves unexpectedly, or a control is inoperable, remove the item from use and follow the school’s reporting and escalation process.
Organize storage around hazards and workflow
Arrange the room so commonly used items are easy for authorized users to find and return, work areas stay clear, and unused equipment is secured. Keep walkways and work zones unobstructed; use dedicated locations for tools, materials, PPE, and cleanup supplies. Store tools securely when they are not in instructional use, with access appropriate to the equipment and activity.
Separate chemical storage by compatibility
If the lab uses hazardous chemicals, store them according to hazard and compatibility, not simply alphabetically or wherever space is available. Follow container labels and safety data sheets (SDS), preserve labels, and make SDS accessible to the people who need them. OSHA’s Appendix A recommends compatible chemical storage and a facility-specific Chemical Hygiene Plan where hazardous chemicals are used in workplaces covered by the laboratory standard. Its recommendations concern laboratory chemical hygiene; they should not be treated as rules that automatically govern every K–12 makerspace.
Rank #2

- Steam autoclavable at 121 degreeC (250 degreeF)
- Polypropylene trays have smooth, rounded corners for easy cleaning and sterilization
- Cover fits snugly onto the tray and allow stacking
- Measures inside dimensions: 11-5/8" length by 6-5/8" width by 5" height
Plan for other equipment-specific hazards
Use the manufacturer’s instructions and the school’s hazard assessment to determine safe placement, access, ventilation, guards, and PPE for the equipment actually in use. A room with a 3D printer, for example, has different considerations from a room using hand tools alone. Do not assume a generic item of PPE is suitable for every hazard: eye protection, gloves, and other controls must match the task and applicable requirements.
Crashes, No Sound, or Screen Glitches?
Random freezes, missing sound and display glitches usually trace back to one bad driver. Find and replace yours safely.Free scan · under a minuteWindows Errors? Fix Them Before They Spread
Repair common Windows errors and clear accumulated junk for a smoother, more stable PC - no reinstall needed.Free scan · no reinstallTrain people for the activity, not just the room
Before students use a tool or begin an activity, train them on the relevant hazards, operating procedures, controls, PPE, cleanup, and how to report a problem. Teachers and other supervising staff need the training appropriate to their roles as well. Keep training records in the form your district requires, and refresh training when equipment, procedures, or the users’ responsibilities change.
The National Science Teaching Association recommends district-supported safety programs that include training, appropriate engineering controls and PPE, chemical hygiene, emergency procedures, and access to SDS for hazardous chemicals. Its position statement says teachers should assess risks for each proposed learning activity and make appropriate modifications when needed: NSTA, “Safety and School Science Instruction”. If reasonable changes cannot make an activity safe, do not proceed with it.
Rank #3
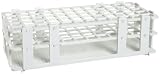
- For 16mm Tubes; 60 places - 5 x 12 rows
- Rack dimensions: 9.7 x 4.1 x 2.5" (24.6 x 10.4 x 6.4cmH)
- Features end plates for easy labeling and lettered and numbered rows for tube identification
- Durable, white polypropylene rack is submersible in a water bath and stable in agitated water
- Assembles in seconds, can be stored flat or stacks with interlocking feet
PPE is task-specific. Select it based on the hazard assessment, manufacturer instructions, school rules, and any applicable standards. Goggles suitable for one activity may not provide the protection required for chemical splashes, impact, lasers, or another specialized hazard. Gloves, when called for, must be compatible with the substance and task.
Build checks into everyday routines
Use repeatable routines so problems are caught before they become incidents. Align each check with the manufacturer’s manual and school procedures; the specific checks will vary by equipment.
Free tools Windows power users keep installed
One-click scans. No signup required.
Before use
- Have the responsible staff member check the item and its required guards, controls, cords, and work area as applicable.
- Confirm that the user has the required training, authorization, PPE, and supervision.
- Do not use equipment with a known defect or an unresolved safety concern.
During setup and use
- Have students use only the equipment and materials authorized for the activity.
- Keep work zones and access routes clear, and follow the activity’s operating and emergency procedures.
- Stop work and report unexpected behavior, damage, spills, or a control failure according to school policy.
At the end of class
- Return tools and materials to their designated storage locations and secure them as required.
- Clean the work area using the approved procedure; handle waste and materials according to their hazards and school rules.
- Record missing or damaged items, unusual noise, electrical concerns, missing guards, spills, and near misses through the designated reporting process.
Make sure staff know whom to notify and how to keep a reported item from being used before it is assessed. Keep the report, status change, and repair or replacement decision with the equipment record.
Rank #4

- 1 Each Dental Sterilization Cassette Rack Tray – Medical Grade Stainless Steel Autoclavable Organizer Box for 7 Dental Instruments with Silicone Holders & Locking Lid
- Secure Silicone Instrument Holders – Features two silicone racks on the lower lid and one on the upper lid to firmly grip instruments, preventing movement or damage during sterilization and transport.
- Durable Medical-Grade Stainless Steel – Made from high-quality stainless steel for long-lasting performance, corrosion resistance, and safe autoclave sterilization.
- Autoclavable & Sterilizable Design – Perforated lid and base allow efficient steam penetration for thorough sterilization; fully autoclavable and easy to clean.
- Compact Capacity for 7 Instruments – Designed to hold up to 7 dental or surgical instruments; ideal dimensions of 7.25" x 3.5" x 1" for organized storage.
Set an inspection calendar that fits the equipment
There is no single interval established for every device in a school STEAM lab. Set checks and service dates using the manufacturer’s manual, district requirements, applicable standards, how often the equipment is used, and the hazards involved. Distinguish routine pre-use checks from scheduled inspections, servicing, and any required calibration.
NSTA’s 2020 technology and engineering safety study recommends an annual facility safety inspection. OSHA’s laboratory recommendations call for regular equipment inspection and maintenance but do not set one interval for every kind of school STEAM equipment. The interval for a particular item should therefore come from the requirements and instructions that apply to it, rather than being inferred from a general recommendation.
Ken Roy’s NSTA-hosted article reporting the 2020 T&E Education—Facilities and Safety Survey describes 718 responses from 42 states. Among those respondents, 75% reported no 3D-printer ventilation, and 18% reported testing eyewash stations for several minutes every week. These are respondent survey results, not precise estimates for all U.S. schools. The article also reports that teachers who described all three specified safety-training experiences were 37% less likely to have reported an accident within the past five years; that is an association, not proof that training caused the difference. See Roy’s 2021 account of the study.
Quick wins for a faster PC:
Fix the driver behind crashes, sound loss and screen glitchesFind Drivers →Clear out junk files and repair common Windows errorsFree Scan →Scan for outdated or missing drivers - takes under a minuteDriver Scan →Best Value
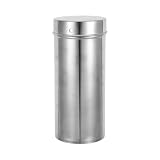
- Stainless steel construction: Made with sturdy stainless steel, this petri dish storage can offers high corrosion resistance and easy cleaning, ideal for laboratory supplies
- Enhanced air circulation: The barrel can features vent holes designed to facilitate airflow input during , provide culture plates with isolation storage
- Universal compatibility: Suitable for storing most culture dishes, the lab storage can accommodates 90mm petri dishes and glassware, meeting diverse scientific needs
- Precision manufacturing: This petri dish organizer is crafted with precise dimensions and shape, ensuring reliable performance and compatibility with max 90mm lab petri dishes
- Effortless handling: Lightweight and easy to use, the stainless steel can for petri dish storage allows researchers to efficiently organize and access petri dishes as needed
Plan purchases, repairs, and retirement before problems arise
Before purchasing equipment or hazardous materials, assess whether the school can use and support them safely. Check the required training, controls, PPE, storage, ventilation, maintenance, consumables, replacement parts, and disposal needs. Confirm that manuals and handling, storage, and disposal information are available before chemicals arrive. Include lifecycle cost and district procurement constraints in the decision, not just the purchase price.
When an item is unsafe or no longer supportable, keep it out of service until a qualified assessment determines whether it can be repaired and returned to use. If it must be retired, follow the school’s and manufacturer’s disposal or decommissioning procedures, especially for hazardous materials, batteries, or equipment with special handling requirements.
Make responsibility and escalation explicit
A written system works only if people know their roles. District leadership should establish the policies, resources, and applicable safety requirements; administrators and safety staff should support implementation and escalation; lab leads should keep inventory, training, and inspection records current; and teachers should supervise activities, apply the relevant controls, and report concerns promptly. Students should follow training, use only authorized equipment, and report hazards or damage rather than attempting repairs.
NSTA’s school science safety position calls for comprehensive, district-supported programs and a process for reporting defective equipment. OSHA’s cited Appendix A is explicitly non-mandatory guidance associated with laboratory chemical hygiene, not a blanket rulebook for every makerspace. Apply the requirements that govern your school, location, workplace, activity, and equipment, and use the manufacturer’s instructions alongside them.
Do these 3 things before closing this tab:
1Repair Windows errors before they cause bigger problems2Fix the driver behind crashes, sound loss and screen glitches3Clear out junk files and repair common Windows errorsQuick Recap
Product prices and availability are accurate as of the date/time indicated and are subject to change. Any price and availability information displayed on Amazon at the time of purchase will apply.



