If a Joy-Con stick drifts or responds incorrectly, troubleshoot and calibrate it before opening the controller. If the problem persists, a compatible replacement joystick may help—but the left and right Joy-Con use different repair procedures. Choose the guide for the affected side, work carefully around the internal cables, then reconnect and calibrate the controller.
Check whether the joystick needs replacing
Start with Nintendo’s troubleshooting steps rather than opening the controller. Update the console and controller, remove any skins or covers from the controller and stick, and calibrate the stick. If the problem occurs in only one game, update that game and check its manual: tilt-control settings, including those in Mario Kart 8 Deluxe, can make stick input seem incorrect.
If the stick cannot be calibrated or still responds incorrectly, Nintendo says the Joy-Con needs service. A replacement module is a repair option, not a guarantee: iFixit notes that persistent problems can involve other controller or console components. If possible, compare the behavior with another controller or console to help narrow down where the fault lies.
See Nintendo’s US troubleshooting and service guidance or UK troubleshooting guidance.
#1 Best Overall
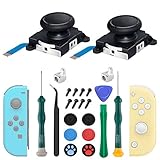
- New Version 3D Analog Joycon Thumbsticks: Our upgrade anti-drift joycon joysticks are compatible with Switch, Switch Lite and Switch OLED, just replace your broken, worn-out or drifting joysticks by yourself, and bring your controller back to life
- Metal Latch Buckles: Alloy slider lock buckles is sturdy and durable, you can replace the damaged original plastic buckle to reduce the frequency of replacement and replacement costs; The metal buckle will firmly fix the metal track to the controller
- Screwdrivers & Spare Screws: The kit is equipped with a magnetic Y1.5 Tri-Wing screwdriver and a magnetic +2.0 Phillips screwdriver, you can switch them as needed at any time; In addition, we also provide you with some spare screws
- Thumb Grip Caps: The included joystick cover caps are compatible with Nintendo Switch, made of safe, soft and comfortable silicone with a good tactile feel, effectively protect your joycon joysticks from scratches, corrosion and other damage
- After-Sale Service: We suggest that you watch tutorials on YouTube or other websites before replacing, and calibrate the joystick after installation is completed; For any product quality issues, please contact us for unconditional after-sales service
Choose the correct guide, joystick and tools
Identify whether the affected controller is the left or right Joy-Con before buying a part or following a repair. The side-specific procedures are not interchangeable:
The left-side guide lists these tools: a Y00 tri-point screwdriver, a Phillips #00 screwdriver, a spudger, tweezers and opening picks. It lists standard Joy-Con/Switch Lite and Gulikit TMR replacement joysticks. iFixit’s catalog has both kit and part-only formats; a kit may include tools, but check the specific listing’s contents instead of assuming all kits are the same.
Rank #2

- 【Universal Compatibility】Perfect fit for Nintendo Switch (2017)/OLED Model/Switch Lite (NOT FOR SWITCH 2), supports both left & right switch joystick replacement.
- 【Comprehensive Repair Kit】Includes 4 joycon analog stick replacement, 4 switch joystick caps, 1 professional spudger and 10 spare “+” screws for effortless replacement (tools not included).
- 【Precision Control Engineering】High-Accuracy Sensor Module with 360° Directional Calibration Optimizes Joystick Response for Smoother Gameplay.
- 【Anti-Slip Thumb Caps】Switch lite replacement joystick with 4 textured grips,enhance comfort and control during intense gaming sessions.
- 【Reliable Customer Support】30-Day Return Policy & Replacement Service Included. For any inquiries about joystick replacement installation, our support team responds within 24 hours.
Before ordering, verify that the part is compatible with your controller model and the side you are repairing. The catalog shows standard and TMR options, but the available information does not establish a durability guarantee for TMR sticks or show that any replacement prevents drift permanently. Compare the listing’s compatibility, included tools, return terms and current availability. See iFixit’s Nintendo Switch parts and repair kits.
Replace the joystick using the side-specific guide
Use the applicable iFixit guide as your step-by-step reference. Do not rely on the left-side instructions for a right Joy-Con, or vice versa; their internal layouts and procedures differ.
Quick wins for a faster PC:
Clear out junk files and repair common Windows errorsFree Scan →Scan for outdated or missing drivers - takes under a minuteDriver Scan →Rank #3

- 【Hall Effect Joystick】Upgrade TMR Hall Effect Stick without any drift and dead zone. High precision control helps gamers have a better gaming experience and achieve higher scores.
- 【Longer Lifespan】The Hall Effect Switch Joystick is designed to be more durable and reliable than traditional carbon film joysticks, reducing the frequent replacements and repairs, save your money and time.
- 【Low Power Technology】50% power consumption less than original carbon film stick, provides more energy saving and longer gaming session.
- 【Easy Installation】Hall Effect Switch Joycon Joystick designed with plug-and-play model, do not need to changing circuit and welding, which helps to reduce the risk of damaging controller.
- 【1:1 Compatibility】Joycon Joystick replacement is fit for Left / Right Joycon of Switch, Switch OLED, Switch Lite.
Opening the left Joy-Con safely
For the left Joy-Con, iFixit’s guide begins by removing four Y00 back-panel screws and opening the seam with a pick. Do not push the pick too far inside, where it could damage internal components. Open the controller like a book rather than pulling the halves apart: two cables still connect the charging rail to the motherboard. Gently disconnect the battery connector before continuing with the guide’s replacement steps.
During reassembly, route the SL/SR cable correctly. The guide warns that incorrect routing can crease the cable. Follow its diagrams and sequence for removing and installing the joystick rather than forcing a connector or internal part.
Rank #4

- Compatibility: High quality replacement analog joystick for Nintendo Switch/Switch OLED Joycon controllers and Switch Lite joystick. Works for Left or Right joy con controller. NOT compatible with Nintendo Switch 2.
- Feature: Replaces you worn-out or damaged analog joystick. Fix the joystick drift issues and bring your controller back to life.
- Extra Accessories 2*Screwdriver, 1*Pry Tool, 1*Tweezer, the accessories make your work more convenient.
- Please Note: please calibrate the joystick using Switch setting after install.If you experience any drift or sudden movement issues with your replacement joystick, please try recalibrating the controller.
- Attention: Please confirm this item is the right model you need before placing order. Most repair parts is only suitable for special model. This item comes with No Manual , No Instruction Guide, No Video Guide. Professional installation skill is needed. To guarantee all replacement parts is in good condition, we had tested it before shipping. We do not hold any responsibility for damaging of this item cause by your wrong installation or your wrong purchasing.
Repairing the right Joy-Con
Follow the dedicated right Joy-Con guide for that controller’s specific disassembly and replacement steps. Do not assume that screw locations, cable routing or connector handling match the left Joy-Con.
Independent reader supportYour contribution helps us test, update, and keep practical guides available for everyone.Reassemble, reconnect and calibrate
Once the controller is fully reassembled, connect it to the Switch and calibrate the new joystick. The right-side guide notes that a power cycle may be needed. Test the stick’s response afterward; if the fault remains or calibration fails, do not assume another joystick will solve it—use Nintendo’s service guidance.
What’s actually slowing this PC down?
Pick the symptom - the matching free tool is one click away.
Best Value

- The Joycon Replacement Joystick works for the Joycon controller of Nintendo Switch (2017 Release), Nintendo Switch lite (2019 Release) and Ninetndo Switch OLED Model (2021 Release)
- TRUE OEM and High Quality joystick replacement fixing the Joy-Con drift, stuttering, blind spots, dead zones, no click, non-centered issues, bring your controller back to life.
- Complete tool set to finish the repair, this is the perfect solution to make your controller working like new again. No need to spend $80 for a brand new controller. Package inlude the "Y1.5" Screwdriver and "+1.5" Cross Screwdriver repair tools, tweezers, and pry tools.
- NOTE: Please Calibrate the Joy-Con by Using Nintendo Switch Setting After Installation.
- We back on our products! If you are not satisfied with your purchase within 90 days, please feel free to contact us. We will reply you within 24 hours.
When to use Nintendo service instead
For the US and Canada, Nintendo’s support page describes an online service request. If the Joy-Con registers as attached but still responds incorrectly, Nintendo says the affected controller needs service; its US guidance says not to send in the console. Outside the US and Canada, Nintendo directs customers to a regional authorized service center.
Nintendo UK says that, until further notice, Joy-Con repairs for responsiveness syndrome are free in the European Economic Area, the UK and Switzerland, whether the issue is caused by defect or wear. This is a regional policy that can change, so check the current Nintendo UK support page before relying on it. For broader troubleshooting context, see iFixit’s Nintendo Switch Joy-Con repair resource.
Quick Recap
Product prices and availability are accurate as of the date/time indicated and are subject to change. Any price and availability information displayed on Amazon at the time of purchase will apply.



