What’s actually slowing this PC down?
Pick the symptom - the matching free tool is one click away.
Moon Animator 2 is a paid plugin for Roblox Studio, not a standalone animation program. Created by @xsixx, it is aimed at Roblox creators who want to animate rigs, props, cameras, and cinematic scenes directly inside their Studio projects. It is especially useful for machinima and cutscenes, but a Moon Animator project is not automatically a single playable Roblox animation asset.
The important workflow is: install the legitimate plugin, animate a properly rigged model, save the editable project, export rig tracks separately, publish those tracks as Roblox animation assets, and script cameras, loose parts, effects, and other scene elements independently where required.


What is Moon Animator 2?
Moon Animator 2 is an animation and filmmaking plugin that runs inside Roblox Studio. Roblox describes Studio plugins as extensions that add functionality to the Studio editor; Moon Animator adds a more scene-oriented animation workflow to that environment. You do not download it as a separate Windows or Mac application, and it does not replace Roblox Studio.
The official Creator Store description is relatively brief, so its broader feature set is best understood through the creator’s Moon Animator 2 Basics tutorial and community workflow documentation. Those materials demonstrate timeline editing, easing, rig animation, prop attachment, Easy Weld, part animation, camera animation, markers, import, export, and hiding the plugin interface. Older tutorials and guides were made for earlier releases, however, so menus and controls may not match the current V34000 listing.
Moon Animator is most useful when the animation is part of a Roblox scene rather than an isolated character clip. You can work with the actual models, lighting, terrain, props, and camera inside Studio and repeatedly preview the result in the environment where it will appear. That convenience is the reason machinima creators and cutscene designers often consider it, even though Roblox’s built-in Animation Editor is sufficient for many ordinary character animations.
The four different things people call a Moon Animator animation
Many export problems come from treating several different kinds of data as if they were interchangeable.
| Thing | What it is | What it does in a game |
|---|---|---|
| Moon Animator project or save data | The editable work you save while building a scene or animation. | Preserves your Moon Animator timeline and scene work. It is not automatically a Roblox animation asset that an Animator can play. |
| Roblox Animation asset | A published Roblox animation containing compatible rig movement. | Can be referenced with an Animation object and played through Animator:LoadAnimation(). |
| Exported camera or object data | Frame-by-frame information for cameras, parts, properties, or other scene elements. | Usually needs a script or playback module to apply the values at runtime. |
| Runtime script or module | Code that coordinates animation tracks, camera values, object transforms, effects, subtitles, and timing. | Turns exported scene data into an in-game cutscene. It is separate from the normal character animation asset. |
A rig animation can become a normal Roblox animation asset. A complete cinematic containing two characters, a moving camera, loose props, particles, lighting changes, and subtitles usually cannot be represented by one call to Animator:LoadAnimation(). Plan the project as several coordinated systems from the start.
The Tool Desk
Outbyte Driver Updater FREEScan for outdated or missing drivers - takes under a minuteDriver Scan →Outbyte PC Repair FREERepair Windows errors before they cause bigger problemsFix Now →Who should use Moon Animator 2?
It is a strong fit for
- Roblox machinima and filmmaking creators.
- Cutscene designers who need character, camera, and prop timing in one Studio scene.
- Animators who want to preview their work with the game’s real models, lighting, and environment.
- Developers animating multiple rigs or combining characters with attached props.
- Creators who work regularly in Roblox and value a Studio-native workflow enough to justify the listed price.
It may be the wrong first tool for
- Someone who only needs an idle, walk, jump, or simple emote for one rig.
- Someone looking for advanced general-purpose modeling, rigging, simulation, constraints, or curve-editing tools.
- Someone who cannot purchase a USD-priced Creator Store plugin in their region.
- A team expecting one purchase to provide an automatically synchronized, one-click cinematic export for every member. No such team-licensing or collaboration promise should be assumed without checking the current terms.
For a basic one-rig animation, Roblox’s built-in Animation Editor can create poses and keyframes, adjust easing, set looping and priorities, save work locally, and publish animations to Roblox. It is the better place to start if you do not need Moon Animator’s scene-focused workflow.
How to install the legitimate plugin
- Open the official Moon Animator 2 Creator Store page.
- Confirm that the creator is @xsixx and the asset ID is 4725618216. Do not use the name alone as proof that a download is genuine.
- Purchase or acquire the plugin through Roblox’s official Creator Store.
- Use the page’s install control, or install it through the Creator Store or Studio Toolbox as described in Roblox’s Creator Store documentation.
- Open Roblox Studio and look for Moon Animator in the Plugins tab.
If it does not appear, first check that Studio is signed in to the Roblox account that owns the plugin. Then check Studio’s plugin management controls and confirm that you installed the official asset rather than a similarly named item. A restart or account refresh may help in some Studio builds, but it should not be treated as a guaranteed Moon Animator-specific fix because installation behavior can vary between Studio versions.
Avoid redistributed, modified, or cracked copies advertised as free equivalents. A GitHub repository identified during research explicitly describes itself as a free or modified version, not the official Creator Store distribution. Roblox also warns creators to be cautious with obfuscated code and assets that load remote content. The safest installation source is the official Creator Store listing.
Prepare the model before animating
Moon Animator does not turn an arbitrary collection of parts into a character rig. Roblox defines a rig as a model with an internal joint structure, such as Motor6D joints or bones. A visible model made from separate, unconnected parts may look like a character but still be unusable by an animation editor.
Rank #2

- Advanced Controller Protection: Secure your Oculus Quest 3 /3S with AMZDM's Controller Grips, ensuring a safe and steady grip during your gaming sessions, offering an added layer of protection for your device.
- Unmatched Comfort & Control: Dive into extended gaming sessions with ease. Their ergonomic design offers a superior fit, allowing you to play for extended periods without discomfort. The enhanced non-slip surface reduces palm sweat and fatigue, ensuring precise control and lasting comfort. Plus, our package includes a pair of textured joystick
- Customizable & Convenient: These Oculus controller straps feature vegan leather elastic knuckle straps, offering excellent abrasion resistance, elasticity, and slip resistance. They are comfortable and easily adjustable to fit hands of most of sizes, providing a secure gaming experience and ensuring you can access all the buttons with ease.
- Built to Last: Crafted from premium silicone material with a unique non-slip pattern, these grips offer lasting durability and safeguard your Oculus Quest 3 /3S from sweat, dust, and scratches. After long-time gaming playing, you could clean it by water or damp cloth with ease.
- Easy to Use: Specifically designed for Oculus Quest 3 /3S touch controllers, these grips offer a perfect fit and are incredibly easy to install and remove. Elevate your VR gaming setup without the hassle of complicated setup processes.
Before opening a timeline, check that the model has:
- A coherent hierarchy of joints or bones.
- Parts connected through the joints expected by the rigging workflow.
- A usable root structure and, where relevant, a correctly configured primary part.
- A consistent naming and hierarchy scheme if the model will be exported or reused.
- An
Animatoror suitable animation setup when you later test it in-game.
For a custom non-humanoid object, you may need to build a fake rig: a model whose parts are connected in a way that Roblox can animate and export as a rig. The exact requirements depend on the model and workflow. Community troubleshooting reports that missing joints, an incorrect root, or broken primary-part relationships can prevent Moon Animator from recognizing a custom model, but these reports should not be mistaken for a complete official Moon Animator specification.
Easy Weld can be useful for attaching a prop to a character or another object. It does not replace a proper joint hierarchy. If a prop needs to move as part of a rig animation, decide whether it should be attached through a compatible joint or treated as an independent scene object that will need its own runtime playback.
A first animation workflow
Button labels can change between plugin releases, so use this as a version-qualified process rather than a promise that every menu appears exactly this way in V34000.
- Insert or prepare a rig. Start with a standard Roblox rig if you are learning. Confirm that it is animatable before adding a complex custom model.
- Open Moon Animator. Launch it from Studio’s Plugins tab and create a new Moon animation or project.
- Add the rig or scene items. Insert the character into the timeline. Add additional rigs, attached props, parts, or a camera only if the scene requires them.
- Set the duration. Choose a timeline length and identify the important frame positions. Establishing timing early makes later editing easier.
- Create the starting pose. Position the rig, then insert keyframes for the joints or transforms you want to animate.
- Create the ending pose. Move to a later frame, change the pose, and insert the next keyframes. Add intermediate poses for anticipation, contact, follow-through, or other important action beats.
- Adjust easing and timing. Linear movement is rarely convincing for a character or camera. Use easing and spacing deliberately, then inspect the transition rather than relying only on the curve name.
- Preview repeatedly. Watch the animation at its intended speed and inspect it from multiple angles. Check feet, hands, attached props, intersections, and the camera’s framing.
- Save the editable project. Save before exporting. The editable Moon Animator work is your source file and should be backed up separately from the published animation asset.
- Export only what needs to become an asset. A rig track and a camera track do not become the same kind of Roblox asset. Export them according to their object type.
- Test in a blank place. Publish and play the result in a minimal test scene before wiring it into a production cutscene.
The creator’s tutorial demonstrates many of these operations, including easing, timeline work, Easy Weld, prop attachment, part and camera animation, export, import, and keyframe markers. An older unofficial beginner guide is still useful for concepts such as inserting items, automatic keyframing, CFrame work, and easing, but its menu paths and hotkeys may be obsolete.
Save, export, and publish are different steps
Saving protects your editable work. Exporting converts selected animation data. Publishing uploads a Roblox asset. Skipping the last two steps is why an animation can look correct in Moon Animator but have no asset ID and no way to play in a live experience.
Current community-reported rig export path
A recent Roblox Developer Forum answer describes the following route for rig tracks:
- In Moon Animator, open File → Export Rigs.
- Find the generated animation under the rig’s
AnimSavesfolder or object structure. - Right-click the generated animation object in Studio.
- Use Studio’s save or export-to-Roblox action.
- Enter the asset information and publish the animation.
- Copy the resulting animation asset ID for use in scripts.
This is a recent community-reported workflow, not a full official Moon Animator manual. The exact location and wording may change with the plugin or Studio version. If your current interface differs, use the official listing and current Studio controls as the authority rather than blindly following an old video.
Rank #3
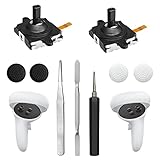
- 【2 × 3D Left/Right Thumb Sticks + 4 × Thumbstick Caps】Perfect replacement analog joysticks for oculus quest 2 controller and quest 3 controller, work for left and right oculus quest 2/3 controller, repair your worn-out, damaged and drift analog joystick. The thumb stick caps can protect your joystick from scratches, corrosion, spallingor other damage. It made of high-quality silicone material, very safe, soft and comfortable.
- 【The 3rd Generation Joystick】The 3rd Generation Joystick is sturdy and durable. This is newest version, we improve internal spring, increase the number of grooves to strengthen the 2nd gen. change the cable to highly conductive one. It's easier to install than previous versions. You can replace the damaged original one to reduce the frequency of replacement and replacement costs.
- 【T5 Screwdriver, Tweezer, Pry Tool】The meta quest 2 controller replacement kit is equipped with a T5 screwdriver, switch at any time according to your needs. Comfortable and easy to open the oculus controller without much force. In addition, we also provide Tweezer, Pry Tool. (Note:Professional installation is highly recommended)
- 【Complete Repair Kit】Package include –2 x Replacement joystick, 4 x Thumb Stick Caps, 1 × Tweezer, Pry Tool, 1 × Metal Pad Tool, 1 x T5 Screwdriver, 1 x T5 Small Screwdriver.
- 【Note】This repair set for oculus quest 2 controller and quest 3 controller does not include meta quest 2 controllers.
Publish under the correct creator
When Roblox presents the publishing form, select the correct creator. If the animation is for a group-owned experience, Roblox’s animation documentation says to select the group in the Creator field. Publishing under a personal account and then trying to use the asset in a group game can create ownership or permission problems.
Play an exported rig animation in Roblox
Once the rig animation has been published, reference its asset ID in an Animation instance, load it through an Animator, and play the returned track. Roblox recommends Animator:LoadAnimation().
local animation = Instance.new('Animation')
animation.AnimationId = 'rbxassetid://YOUR_ANIMATION_ID'

local character = script.Parent
local humanoid = character:WaitForChild('Humanoid')
local animator = humanoid:WaitForChild('Animator')

local track = animator:LoadAnimation(animation)
track:Play()
Replace YOUR_ANIMATION_ID with the numeric ID Roblox gave you after publishing. The rig must have the joints expected by the animation, and the Animator must be in a model that is in Workspace when the animation is loaded.
Replication depends on the model and where the animation is started. Player-character animations have different client and server behavior from non-player characters. For an NPC or other non-player model, the server generally needs to load and start the animation if other clients must see it. Follow Roblox’s animation runtime guidance and the Animator reference for the relevant case.
Recommended Free Tools
If you use an AnimationController for a non-humanoid model, create or use an Animator under that controller and load the animation through the Animator. Do not build new code around the deprecated AnimationController:LoadAnimation() path; Roblox’s AnimationController reference documents the current direction.
Building a full cutscene
Moon Animator can help author a complex cutscene, but authoring and playback are separate problems. Treat a cinematic as a collection of synchronized tracks rather than expecting one universal animation file.
Characters and multiple rigs
Export each rig’s compatible animation data and publish the resulting assets as needed. At runtime, load the tracks on the relevant humanoids or animation controllers and coordinate their start times. If characters have different animation lengths, decide whether the cutscene controller should wait for markers, use a shared clock, or stop tracks explicitly.
Cameras
A camera is not a character rig, so it is not normally loaded through Animator:LoadAnimation(). Community workflows describe exported camera data containing values such as:
Free tools Windows power users keep installed
One-click scans. No signup required.
CFramevalues for camera position and orientation.- Field-of-view values.
- Frame folders or equivalent timeline data.
- Settings needed by the playback code.
At runtime, a client-side cutscene script generally sets workspace.CurrentCamera.CameraType to Enum.CameraType.Scriptable, then applies the exported CFrame and field-of-view values according to the cutscene clock. Restore the player’s camera mode when the sequence ends.
Use frame-aware timing rather than assuming that repeated task.wait() calls will maintain perfect cinematic timing. A recent community camera playback discussion specifically addresses frame timing and camera data. Its data format and code are community solutions, not official Moon Animator APIs.
Props and loose parts
A prop attached to a rig through compatible joints or Motor6D joints may be included in a rig animation. A loose part moved by CFrame is different: it is not automatically converted into a standard Roblox animation asset just because Moon Animator displayed it on the timeline.
Independent parts and models may require exported data plus a script that applies CFrames or other properties over time. Some community exporters attempt to generate scripts for parts and cameras. One such community object exporter has reported limitations around easing, loops, models, and particles. Treat such tools as optional third-party dependencies, not as official components or guaranteed compatibility layers.
Do these 3 things before closing this tab:
1Fix the driver behind crashes, sound loss and screen glitches2Repair Windows errors before they cause bigger problems3Scan for outdated or missing drivers - takes under a minuteVFX, particles, subtitles, and properties
Particle emission, transparency, GUI changes, subtitles, lighting, sound cues, and other property tracks normally need explicit runtime logic. A robust cutscene may therefore contain:
- Published Roblox animation assets for character rigs.
- Camera data and a client-side camera controller.
- Object or prop data and scripts that apply transforms.
- Effect triggers keyed to frames, markers, or timestamps.
- GUI and subtitle code.
- A cleanup routine that restores the camera, visibility, joints, effects, and player controls.
Community playback modules exist for Moon Animator data involving multiple objects or characters. For example, a third-party module was designed to provide frame control, looping, and playback management. Its existence shows why complex Moon scenes need a runtime interpreter; it is not an official Roblox or Moon Animator component. Test its compatibility with your plugin version, save format, easing modes, and model structure before making it a production dependency.
Moon Animator 2 compared with the alternatives
| Need | Best starting point | Why |
|---|---|---|
| Basic idle, walk, jump, or emote on one Roblox rig | Roblox Animation Editor | Free, built into Studio, officially documented, and sufficient for standard rig keyframing and publishing. |
| Roblox-native machinima and cutscenes | Moon Animator 2 | Its scene-oriented workflow is useful when several rigs, props, and cameras need to be previewed together in Studio. |
| Broad external 3D animation work | Blender | Blender is a free, open-source 3D suite with broader modeling, rigging, and animation capabilities, at the cost of more import and pipeline management. |
| External animation import into Studio | Blender plus Roblox’s Animation Clip Editor | Roblox’s 2026 update added improved FBX and glTF importing and support for multiple clips in one file, making external workflows more capable than older comparisons suggest. |
| Multi-object runtime cinematics | Moon Animator plus custom scripting or a compatible module | Rig assets, camera data, loose parts, properties, and effects usually need separate playback systems. |
Roblox documents both its Blender workflow and the 2026 Animation Clip Editor improvements. Blender is not objectively better for every Roblox creator: it offers broader tools and potentially transferable 3D skills, while Moon Animator reduces the distance between authoring and previewing inside Studio.
Independent reader supportYour contribution helps us test, update, and keep practical guides available for everyone.Troubleshooting Moon Animator 2
| Symptom | Likely cause | Fix |
|---|---|---|
| Moon Animator is absent from Studio | Wrong account, incomplete installation, disabled plugin, or an outdated tutorial showing a different UI. | Verify the official creator and asset ID, confirm the Studio account owns the plugin, inspect the Plugins tab and plugin management controls, and use the current Store installation path. |
| The model cannot be added or does not animate | The model is not a valid rig or has missing joints, root structure, or primary-part relationships. | Inspect its Motor6D or bone hierarchy and confirm that it is assembled as an animatable rig. A collection of loose parts is not automatically a rig. |
| The animation works in Moon Animator but has no asset ID | The project was saved locally but never exported and published. | Save the source project, use File → Export Rigs where available, inspect AnimSaves, publish the generated animation through Studio, and copy the new ID. |
| The character moves but the camera does not | Camera data is not a normal character animation asset. | Export or reproduce the camera data and write a runtime controller that drives CurrentCamera in Scriptable mode. |
| Only one object exports | The scene contains several independent tracks rather than one rig hierarchy. | Export and play each rig or object separately, or use a compatible scene playback module. Do not expect unrelated loose objects to be included in a rig asset. |
| A group-owned game cannot use the animation | The asset was published under the wrong creator. | Publish the animation with the group selected in the Creator field and verify the asset’s ownership and permissions. |
| The runtime animation fails or does not replicate | Incorrect Animator location, client/server startup, asset ownership, or incompatible rig. | Use an Animator under the character or animation controller, load through Animator:LoadAnimation(), and follow Roblox’s replication rules for player and non-player models. |
| An old tutorial’s buttons or hotkeys do not match | Version drift. Popular guides often cover 2020–2021 releases, while the Store listing shows a later update and V34000. |
Use old tutorials for concepts only. Confirm current labels and paths in your installed version before relying on a shortcut or menu location. |
| A third-party exporter or playback module breaks | It may depend on Moon Animator’s internal save format or lack support for a particular easing mode, particle, model, or property. | Test a minimal scene, pin the tool version, inspect its documentation and source, and keep a fallback manual-script workflow. |
Is Moon Animator 2 worth buying?
Buy it if Roblox animation or machinima is a regular part of your work and you want to author scenes inside Studio. The $29.99 listing price may be reasonable for creators who need multi-element scene editing, camera work, prop timing, and Roblox-native previewing often enough to use those features.
Quick wins for a faster PC:
Repair Windows errors before they cause bigger problemsFix Now →Fix the driver behind crashes, sound loss and screen glitchesFind Drivers →Best Value

- Not easy to fall off, protect the controller: Non-slip finely woven nylon straps of the controller straps for quest 3S for Quest 3 controller grips prevents the controller from sliding or accidentally falling off during use, adding some sort of grip to the controllers and providing extra protection for your device.
- Immersive gaming experience: Using the controller straps for meta quest 3S for Quest 3 controller grips reduced the in-game jittery, shakiness of the controls by around 90% and allows for such a greater precision in-game to a degree and allowing you to enjoy an immersive gaming experience.
- Suitable for large and small hands: The finely woven nylon strap of the active straps for quest 3S/3 accessories has excellent elasticity and anti-slip properties, which increases the friction with the hand. It's easily adjustable and non-deformable, fits huge hands and can be resized to fit smaller hands, doesn't add perceivable weight to the controllers and helps keep the controller straps for quest 3S for Quest 3 controllers closer to your palm so you can press buttons easier.
- Easy access to the batteries,100% Signal: Easy to access the batteries, easy to wear, easy to take off. The minimalism also benefits the controller grips compatible with meta quest 3S/3 accessories as there is no concern regarding sensor LEDs being blocked.
- Durable: The controller straps for oculus quest3S for Quest 3 controller grips is made of ABS plastic which has strong impact resistance. The metal buckle below makes the controller difficult to fall off and is more durable.
Start with Roblox’s Animation Editor if you only need simple character clips. It avoids the purchase and gives you an official workflow for rig poses, keyframes, easing, looping, priorities, local saves, and publishing.
Choose Blender if your priorities are broader 3D production, advanced rigging, external assets, or skills that transfer beyond Roblox. Expect to manage import settings and the boundary between Blender and Studio. Roblox’s improved 2026 FBX and glTF animation import makes that route more practical, but it does not remove the need to test rigs and timing after import.
Do not buy Moon Animator expecting every camera, CFrame, part, property, subtitle, and particle track to become playable through one Roblox animation ID. Its strongest value is as an authoring environment; a finished in-game cinematic still needs an asset and playback architecture.
Sources and version notes
- Official Moon Animator 2 Creator Store listing — creator, asset ID, price, dates, type, and version marker.
- Roblox Creator Store documentation and Studio plugin documentation — installation context.
- Roblox Animation Editor documentation — rig animation, local saves, publishing, and creator selection.
- Roblox Animator reference and animation runtime documentation — in-game playback and replication considerations.
- Creator’s Moon Animator 2 Basics tutorial — demonstrated feature and workflow reference.
- Recent community export discussion — File → Export Rigs and AnimSaves workflow.
- Roblox’s 2026 Animation Clip Editor announcement — FBX, glTF, and multi-clip import context.
Frequently Asked Questions
Is Moon Animator 2 a standalone program?
No. It is a Roblox Studio plugin. You need Roblox Studio installed and must open the plugin from Studio’s Plugins workflow. The official listing is the Creator Store page for asset 4725618216.
Can I load a Moon Animator project directly with Animator:LoadAnimation()?
No. A saved Moon Animator project is editable source data, not automatically a published Roblox Animation asset. Export the rig, publish the generated animation through Studio, then use its asset ID with Animator:LoadAnimation(). Camera, loose-object, and effect data needs separate playback code.
Can Moon Animator 2 export an entire cutscene as one Roblox animation?
Do not assume so. Character rigs can be exported as Roblox animation assets, but cameras, loose parts, CFrame tracks, VFX, subtitles, and property changes commonly require separate exported data, scripts, or a compatible third-party playback module.
Does buying Moon Animator 2 give every team member access?
Do not assume that one purchase covers a team or establishes a special collaboration license. Check the current Creator Store terms and your team’s account setup. Keep editable project files and published assets organized separately so collaborators can work from the same source of truth.
Why does my character animate in Moon Animator but not in my game?
The project may only have been saved, or the rig may not have been exported and published. Use File → Export Rigs if that control is available in your version, locate the generated animation under AnimSaves, publish it, and then verify the rig, asset ownership, Animator location, and client/server playback setup.
Crashes, No Sound, or Screen Glitches?
Random freezes, missing sound and display glitches usually trace back to one bad driver. Find and replace yours safely.Free scan · under a minutePC Slower Than It Used to Be?
A free scan shows the junk files, broken settings and background clutter dragging Windows down - then fixes them in one click.Free scan · Windows 10 & 11The Bottom Line
Moon Animator 2 is best understood as a Roblox-native scene authoring tool, not a universal cutscene exporter. It is a good purchase for creators who regularly build machinima, camera shots, or multi-element scenes in Studio. For a basic one-rig animation, use Roblox’s free Animation Editor; for a broader 3D pipeline, consider Blender. Whichever tool you choose, keep the editable project, published rig assets, camera data, and runtime cutscene scripts as separate parts of the production pipeline.
Quick Recap
Product prices and availability are accurate as of the date/time indicated and are subject to change. Any price and availability information displayed on Amazon at the time of purchase will apply.




