Quick wins for a faster PC:
Clear out junk files and repair common Windows errorsFree Scan →Scan for outdated or missing drivers - takes under a minuteDriver Scan →The best starting point for N64 emulation in RetroArch is Mupen64Plus-Next with default settings. Install RetroArch from an official or distribution-supported source, install the Nintendo 64 (Mupen64Plus-Next) core, load a lawfully obtained game image, and configure the controller while the game is running. Begin at 4:3 with no shaders, texture pack, widescreen patch, or run-ahead enabled; then change one setting at a time if a particular game needs it.
This guide covers the complete practical setup: core selection, Windows/Linux/Android installation routes, N64 controller mapping, graphics tuning, texture packs, saves, Transfer Pak features, BIOS requirements, local multiplayer, netplay limitations, recording, and troubleshooting. RetroArch is the frontend; the libretro core is the emulator.
As an Amazon Associate I earn from qualifying purchases.
What RetroArch actually is
RetroArch is a frontend and emulation platform, not the N64 emulator itself. It provides the menus, controller handling, video options, saves, shaders, recording, and netplay framework. The actual N64 emulation is supplied by a libretro core that runs inside RetroArch.
Recommended Free Tools
For most games, start with Nintendo 64 (Mupen64Plus-Next). It is the best general-purpose starting point because it offers broad compatibility and extensive graphics, input, save, remapping, and enhancement options. Keep ParaLLEl N64 in reserve for particular compatibility cases, 64DD content, or hacks that behave better with its alternate implementation. It is not necessary to install every N64 core before you begin.
#1 Best Overall

- Use the generic standard USB port, if your program or application accepts USB controller input, it can be used natively without drivers or patches, JUST PLUG AND PLAY!
- Supported Operating system: Windows 98, ME, Vista, 2000, 2003, XP, 7, 8, 8.1, 10; Linux UBUNTU, Linux Mint, Android Linux (via an USB OTG cable); Mac OS X and beyond; Retrogaming operating systems: RetroPie, Recalbox, Happi Game Center, Lakka, ChameleonPi, Piplay.
- Supported Device (With USB storage device): PC, Notebook Computer, Laptop Computer; Android Smartphone: connect via an USB OTG cable; Raspberry Pi (RPI, Raspberry pie): Raspberry Pi 1 Model B, Model A, Raspberry Pi 1 Model B+, Raspberry Pi Zero, Raspberry Pi 2, Raspberry Pi 3 Model B, Raspberry Pi 3, Retro Pie. --- Note: NOT SUPPORT Android TV BOX.
- Supported Game Emulators: Current: Project64, 1964, MAME (MESS), Mupen64Plus, Sixtyforce, CEN64; Historical: Project Unreality, Corn, UltraHLE, Nemu64.
- Super sensitive buttons for precision control. Third party controller, not original Nintendo 64 controller. But it works phenomenal with the Raspberry Pi game emulation and so on. Cord is approx 5.9 ft. Long.
Before you install anything: content and legal limits
Emulation software and unauthorized distribution of game files are separate issues. Install RetroArch and its cores from an official or distribution-supported source, and use only game images and system files that you obtained lawfully. Do not treat ownership of original hardware as an automatic answer to every copying question in every jurisdiction.
Install RetroArch and the N64 core
Download the current stable RetroArch build appropriate for your operating system from an official RetroArch source or use a package maintained by your operating system’s distribution. Avoid unofficial repacks that bundle unknown cores, BIOS files, or game content.
What’s actually slowing this PC down?
Pick the symptom - the matching free tool is one click away.
Windows
Windows users generally choose between an installer and a portable/archive package. The installer is convenient for a normal desktop installation. The archive version is useful if you want RetroArch to remain self-contained or do not have administrator access. Whichever option you choose, keep the RetroArch program and its folders together until you understand where your saves, states, cores, and system files are stored.
Linux
Linux availability depends on the distribution. A distribution package, Flatpak package, or another officially supported route may use different folder permissions and may not expose every core-download feature. If the core downloader is missing, install the N64 core through the package route supported by your distribution rather than downloading a random core file.
Android
Android users can use the official Android distribution route or the official F-Droid guidance where applicable. Android’s storage permissions can affect content, save, and system directories. If RetroArch cannot see a game file, check its file-access permission and the directory selected in RetroArch rather than immediately moving files into arbitrary system folders.
Install Mupen64Plus-Next
- Open RetroArch.
- Choose Online Updater.
- Open Core Downloader, when that feature is available in your build.
- Select Nintendo 64 (Mupen64Plus-Next).
- Return to the main menu and choose Load Core to confirm that the core is available.
Core names and menu availability can vary slightly by platform package. If Core Downloader is absent, use the core package provided by your official or distribution-supported RetroArch installation.
Crashes, No Sound, or Screen Glitches?
Random freezes, missing sound and display glitches usually trace back to one bad driver. Find and replace yours safely.Free scan · under a minutePC Slower Than It Used to Be?
A free scan shows the junk files, broken settings and background clutter dragging Windows down - then fixes them in one click.Free scan · Windows 10 & 11Load a legally obtained N64 game
- From the main menu, choose Load Content.
- Browse to the folder containing your legally obtained N64 image.
- Select the game file.
- If RetroArch asks which core to use, select Mupen64Plus-Next.
Mupen64Plus-Next documents common N64 image extensions including .n64, .v64, .z64, .bin, .u1, and .ndd. An extension alone does not prove that a file is valid: a damaged, incomplete, incorrectly dumped, or unsupported image can still fail to load.
For a first test, use one unmodified game image and the core’s default settings. Do not add a texture pack, widescreen patch, shader, run-ahead, or custom remap until you know the basic installation works.
Choose the right N64 core
Mupen64Plus-Next: the default choice
Mupen64Plus-Next is an up-to-date libretro port of Mupen64Plus. Its default graphics path uses GLideN64, while other documented graphics options include Angrylion and ParaLLEl. The core also exposes internal resolution, filtering, framebuffer behavior, CPU and RSP emulation modes, texture features, save states, rewinding, cheats, remapping, rumble, and Transfer Pak-related subsystems.
That flexibility makes it the sensible first core for ordinary N64 games. It also means that a setting that improves one title can make another title slower or less accurate. Begin with the defaults and change one option at a time.
ParaLLEl N64: a targeted alternative
ParaLLEl N64 is a separate N64 libretro core with a substantially diverged codebase. It is worth testing when you need 64DD support, a particular hack behaves incorrectly in Mupen64Plus-Next, or a title benefits from an alternate plugin and compatibility path.
Rank #2
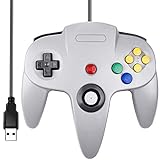
- Plug & Play: Standard USB controller; no drivers needed for compatible devices
- Compatible with Windows PC, macOS, Linux and Raspberry Pi
- Iconic original M-shaped configuration, featuring 10 action buttons, a precision analog Control Stick, and an 8-way D-pad.
- The 3D analog stick provides nuanced control for precise movements and enhanced gameplay comfort.
- Features a 6-foot (1.8 m) cable for comfortable gameplay.
Do not interpret the existence of two cores as a universal performance ranking. A game can work better in one core because of its individual graphics, timing, audio, or controller requirements. If Mupen64Plus-Next runs the game correctly, there is usually no reason to switch merely because ParaLLEl N64 is available.
Configure an N64 controller correctly
The N64 layout is unusual: it has a central analog stick, four C buttons, a Z trigger, L and R shoulder buttons, a D-pad, A, B, and Start. A modern gamepad works, but it does not have a natural one-to-one equivalent for every N64 control. The goal is to create a layout that preserves the analog stick and makes the C buttons and Z trigger easy to reach.
Basic mapping
- Connect the controller before starting the game.
- Open Settings > Input and confirm that the correct device is assigned to the relevant port.
- Launch the game.
- While the game is running, open the Quick Menu and choose Controls.
- Open the controls for Port 1 and inspect the N64-to-RetroPad mapping.
- Test the layout in the game before saving it.
Menu labels can differ slightly between RetroArch versions and platform packages, but the important distinction is that general RetroPad bindings and the N64 core’s controls are not always the same screen. If the buttons appear correct in the menu but behave incorrectly in the game, inspect the active device index and the core’s Port 1 controls.
Free tools Windows power users keep installed
One-click scans. No signup required.
A practical modern-gamepad layout
- Analog stick: Use the left stick for N64 movement. Preserve its full range rather than replacing it with digital directions.
- C buttons: Map C-Up, C-Down, C-Left, and C-Right to the right stick or another reachable four-direction cluster.
- Z: Use a shoulder or rear trigger that can be held comfortably.
- L and R: Keep them on separate shoulder buttons and do not combine either one with Z.
- A and B: Place them on the main face-button cluster.
- D-pad: Keep it available for menus and games that use it heavily.
- Start: Assign it to a distinct button that is not easy to press accidentally.
Test the analog range in a game that requires fine movement. A stick can appear functional while still having an unsuitable dead zone, a restricted range, or a poor center position. Do not save a permanent remap until movement, C-button directions, Z, triggers, and menu controls all work as expected.
Save the right kind of remap
RetroArch supports several remap scopes:
- Core Remap File: applies a general layout to games using that core.
- Content Directory Remap: applies a layout to games in a particular content folder.
- Game Remap File: applies a special arrangement to one title.
With the game running, open Quick Menu > Controls, make the changes, and use the available save-remap command. Use a core remap when most N64 games share your preferred layout. Use a game remap when one title needs an unusual arrangement, such as a game that relies heavily on the D-pad or has a different C-button role.
Optional hardware: an N64-style USB controller
A USB N64 controller is an optional quality-of-life upgrade for players who want the original control geometry. It is not required for RetroArch. Product quality varies widely: analog-stick precision, rumble motors, button feel, driver behavior, and compatibility with Windows, Linux, Android, and other hosts are not uniform across USB N64-style controllers. Verify the current device’s host support and return policy before buying.
Rumble
Rumble requires all of the following:
- A game that supports rumble.
- A physical controller with a working rumble motor.
- An input driver that exposes rumble to RetroArch.
- The relevant player Pak setting configured for a rumble-capable Pak.
If rumble does not work, test the controller with another application, verify that the correct input device is active, and check the player’s Pak option in the Mupen64Plus-Next core settings. A controller that maps every button correctly can still lack a supported rumble path.
Do these 3 things before closing this tab:
1Repair Windows errors before they cause bigger problems2Fix the driver behind crashes, sound loss and screen glitches3Clear out junk files and repair common Windows errorsGraphics: get a stable baseline first
Launch the game with the default core settings and establish a known-good baseline before tuning. The most consequential options are internal resolution, aspect ratio, framebuffer emulation, RSP mode, CPU emulation mode, filtering, multisampling, and texture enhancements.
Internal resolution and filtering
Increasing internal resolution makes 3D geometry look sharper, but it increases GPU demand. Filtering and multisampling can also affect performance and may change the appearance of N64 texture edges. If a game becomes slow, unstable, or visually incorrect after an enhancement, return to the previous setting instead of changing several options at once.
Framebuffer emulation and depth-buffer behavior can improve effects or compatibility in some games, but accuracy-oriented options can cost additional processing time. They are not automatic fixes for every graphical problem.
CPU and RSP modes
Mupen64Plus-Next exposes a dynamic recompiler, cached interpreter, and pure interpreter CPU options. Dynamic recompilation is the fastest documented mode where supported and should be the starting point. Interpreter modes are useful for troubleshooting unusual compatibility problems, but they are generally more demanding.
The core also exposes HLE and LLE RSP modes. HLE is normally the practical starting point. LLE can be useful for a particular compatibility or accuracy case, but it can require substantially more processing power and is not a universal upgrade.
Rank #3

- Wireless controller fully compatible with Switch 1 / Switch 2 and N64 console
- Lag-Free 2.4 GHz wireless, 10m/33ft range, no delay, plug & play
- Built-in rumble vibration for immersive gameplay. No Extra Rumble Pak Required
- Built-in rechargeable battery, 10-hour runtime
- The 3D analog stick provides nuanced control for precise movements and enhanced gameplay comfort.
Use 4:3 unless the game genuinely supports widescreen
Use 4:3 as the safe presentation default. The core documentation identifies 4:3 as supported by all N64 games. Some games provide their own widescreen behavior, but stretching every title to 16:9 changes the original composition and can make characters or environments look unnaturally wide.
When a game has a legitimate widescreen mode, prefer its in-game option or a core-supported adjusted mode over indiscriminate display stretching. If the picture looks distorted, return to 4:3 before investigating more complicated graphics settings.
Texture packs and other enhancements
High-resolution texture packs are an advanced step, not part of the initial setup. Mupen64Plus-Next documents two main workflows: using a precompiled .htc pack or compiling a pack from uncompressed Rice-source textures.
A texture pack’s folder and cache names must correspond to the game name recognized by the core. The pack may also depend on particular texture, filtering, or graphics options. Moving a pack to another computer without moving the expected files or preserving compatible options can make it appear as if the pack is broken.
- Confirm that the unmodified game runs correctly.
- Back up your working configuration and saves.
- Install one texture pack, following its documentation.
- Verify the game-name folder, cache location, and texture format.
- Check the core options required by that pack.
- Test gameplay, menus, effects, and loading areas before adding another enhancement.
Texture enhancements improve presentation, not necessarily emulation accuracy. A pack that looks excellent in one game may produce missing textures, excessive memory use, or incorrect effects in another.
Save files, save states, and backups
In-game saves
An in-game save is created through the game’s normal save system and is the primary record you should preserve. Mupen64Plus-Next documents cartridge backup-save handling using .srm-style files. The exact location depends on your RetroArch directory configuration and platform package; inspect Settings > Directory to find the configured save-file directory.
After saving inside a game, allow the game to finish writing before closing RetroArch. Back up the save directory periodically, especially before changing cores, moving a library, or installing texture packs and other modifications.
The Tool Desk
Outbyte PC Repair FREEClear out junk files and repair common Windows errorsFree Scan →Outbyte Driver Updater FREEFix the driver behind crashes, sound loss and screen glitchesFind Drivers →Save states
A save state is a snapshot of the emulator at a particular moment. RetroArch commonly stores numbered state files such as .state1, .state2, and similar slots. States are convenient for difficult sections, testing settings, and quickly returning to a position, but they are not a replacement for normal saves.
A state can become unusable after a core change, RetroArch update, content change, or major configuration change. Keep a current in-game save and treat states as disposable checkpoints. If a state suddenly fails to load, start from the game’s normal save rather than repeatedly overwriting it with newer states.
Transfer Pak support
Transfer Pak features are game-specific. A Pokémon Stadium-style setup may require the N64 game image, a matching Game Boy or Game Boy Color image, and the corresponding save file. Mupen64Plus-Next documents workflows that either place matching filenames in one folder or use RetroArch’s subsystem sequence.
This is not a promise that every N64 title can use a Transfer Pak. Use the core’s documented Transfer Pak instructions for the specific game, verify that the handheld image and save are lawfully obtained, and back up both save files before experimenting.
BIOS and system files
Do not download proprietary BIOS files from random websites. RetroArch and Libretro do not distribute copyrighted system files or game content.
Rank #4

- 🎮[Compatible ]Compatible with the original N64 system console, wired controller for enjoying old school Online N64 video games, perfectly for Mario Kart 64, Zelda n64, Mario party, Perfect Dark, Super Mario 64, ocarina of time 64,Super Smash Bros and many other N64 games.(Not for Windows PC Games)
- 🎮[Ergonomic Design]Tight and accurate analog control, the controller features 10 function buttons (including Left and Right shoulder functions and Z-trigger). Based on ergonomic and designed to fit your hands nicely, easier to grip than other controllers. It is a great replacement for old original N64 controller you have.
- 🎮[Rumble Pak & Memory Card ]: Compatible with most of game memory cards. you can use a memory card and transfer the game memory card save data. Upgraded 3D analog control stick commands your action with precision, perfectly compatible with N64 System console.
- 🎮[N64 Wired connection]The cord is approx. 1.7 meters (6ft), including a push-on N64 connector and easy to use. Use a N64 Controller Extension Cord Cables, you can play across the room. The joystick is removeable and replaceable.
- 🎮Third party controller, not original N64 controller(non-USB edition). The best gift for your families or friends, that will bring back those childhood memories when you are playing these classic N64 games.
A BIOS is needed only when the relevant core or content requires one. When required, the file normally belongs in RetroArch’s configured system directory and must have the correct filename, version, region, and integrity. A file with the right name but the wrong dump or region may fail just as completely as a missing file.
If a game loads normally without a BIOS, do not add one simply because an online setup list says that every emulator needs one. Check the core’s current documentation for the exact requirement and place only lawfully obtained system files in the configured system directory.
Local multiplayer versus online netplay
Local multiplayer
Local multiplayer is the more realistic N64 multiplayer option. Mupen64Plus-Next documents joypad support for up to four users. Connect the controllers, open Settings > Input, assign the correct device to Ports 1 through 4, and verify each player’s controls from Quick Menu > Controls while the game is running.
Some games require the correct number of controllers or a particular in-game multiplayer mode. Test each port before starting a tournament or a long session, because a controller can be connected to the operating system while still being assigned to the wrong RetroArch port.
Online netplay
Do not treat RetroArch netplay as a dependable solution for N64 multiplayer. RetroArch’s general netplay model synchronizes multiple instances using matching core and content conditions, serialized state, delayed input, rewinding, and replay. However, the official netplay FAQ identifies N64 netplay as impractical under the current model because of its performance requirements.
If you test online play anyway, matching content and core conditions are necessary but may not be sufficient. Unreliable N64 netplay is not necessarily caused by port forwarding or a single network setting. For a predictable multiplayer session, use local controllers on one machine where the game supports it.
Independent reader supportYour contribution helps us test, update, and keep practical guides available for everyone.Record or stream RetroArch gameplay
RetroArch can record gameplay in real time through FFmpeg/libavcodec, with lossless, lossy, and live-streaming workflows available in supported builds. Stabilize the game first, confirm that audio and video remain synchronized, and only then configure recording.
Free tools Windows power users keep installed
One-click scans. No signup required.
Depending on the build, recording commands may appear from the main menu or Quick Menu, and recording options are exposed under the recording settings. If those options are unavailable, your package may lack the required FFmpeg support.
Higher internal resolution, shaders, texture packs, and recording all add system load. If recording introduces stutter, first return to the stable graphics baseline, disable shaders, lower internal resolution, and test again. A capture device is not required to record software-emulated RetroArch gameplay. A USB HDMI capture card becomes relevant only when you are capturing an external console, another computer, or a broader hardware video workflow.
Troubleshooting decision tree
The game does not load
- Confirm that Mupen64Plus-Next is installed and selected.
- Check that the file uses a supported extension such as
.n64,.v64,.z64,.bin,.u1, or.ndd. - Try the content with default core settings.
- Check whether the image is complete and readable by testing it with an appropriate file or checksum tool.
- Determine whether the title needs a BIOS or other system file, and if so, verify its lawful source, filename, region, and integrity.
- If one core fails, test the other documented N64 core only as a diagnostic comparison, not as proof that the content is valid.
The game loads but the controls are wrong
Open Settings > Input and verify the device index for the correct player. Then inspect Quick Menu > Controls and the N64 control mapping. Check the analog stick, C-button directions, Z, L, R, A, B, D-pad, and Start inside the game.
Do not save a core or game remap until the active device and mapping are correct. If only one game is unusual, use a Game Remap File rather than changing the layout for every Mupen64Plus-Next title.
The picture is stretched, missing effects, or distorted
- Return the aspect ratio to 4:3.
- Disable aggressive widescreen options.
- Return framebuffer emulation, filtering, and resolution options to their defaults.
- Temporarily remove any texture pack.
- Test the game again before changing the graphics plugin or RSP mode.
If the issue appears only with a texture pack, check that the pack expects the current game-name folder, cache, texture format, and core options.
Best Value

- Wireless controller fully compatible with Switch 1 / Switch 2 and N64 console
- Lag-Free 2.4 GHz wireless, 10m/33ft range, no delay, plug & play
- Built-in rumble vibration for immersive gameplay. No Extra Rumble Pak Required
- Built-in rechargeable battery, 10-hour runtime
- The 3D analog stick provides nuanced control for precise movements and enhanced gameplay comfort.
The game stutters or audio and video fall out of sync
Use this order so that you do not change several variables at once:
- Restore the core to its default options.
- Disable shaders and run-ahead.
- Lower internal video scale or resolution.
- Test another available video driver.
- Verify vsync and RetroArch’s estimated display refresh rate.
- Test threaded video only with its trade-offs understood: it can increase latency or compromise ideal vsync behavior.
- Retest without recording or streaming.
Accurate audio and video synchronization depends on correct display-refresh-rate configuration. Do not assume that the game image or N64 core is the cause before checking system-wide video settings.
Collect a useful log
If the problem remains, enable the available logging options under Settings > Logging, reproduce the problem once, and record:
Recommended Free Tools
- RetroArch version and build type.
- Operating system and device.
- CPU, GPU, and graphics driver.
- Selected video driver.
- Mupen64Plus-Next or ParaLLEl N64 version.
- Game name and file format.
- Core options changed from default.
- Whether shaders, run-ahead, texture packs, recording, or netplay were enabled.
A log containing this context is far more useful than reporting only that a game is slow.
A texture pack fails
Verify the game-name folder, cache location, texture format, and the core options required by the pack. Confirm that the pack matches the exact game region or revision when its documentation specifies one. Remove the pack and confirm that the original game still runs before troubleshooting further.
Rumble does not work
Confirm that the game supports rumble, the controller has a rumble motor, the input driver exposes rumble, and the correct player Pak option is selected. Test another rumble-capable controller or application if possible. Button mapping alone does not prove that the rumble path is supported.
Online N64 play is unreliable
Do not assume that port forwarding is the only problem. The official RetroArch netplay guidance identifies practical performance limitations for N64 under the current model. Check matching core and content conditions if you are experimenting, but use local multiplayer for the most dependable result.
A reliable first-session checklist
- Install RetroArch from an official or distribution-supported source.
- Install Nintendo 64 (Mupen64Plus-Next) through Core Downloader when available.
- Load one lawfully obtained, unmodified N64 image.
- Leave core graphics options at their defaults.
- Use 4:3 initially.
- Map the analog stick, C buttons, Z, L, R, A, B, D-pad, and Start.
- Test the controls in-game before saving a remap.
- Create an in-game save and locate the save directory.
- Use save states only as convenience checkpoints.
- Add enhancements one at a time after the baseline is stable.
- Prefer local multiplayer over promises of reliable N64 internet netplay.
- Configure recording only after gameplay and synchronization are stable.
Frequently Asked Questions
Do I need a BIOS for N64 emulation in RetroArch?
Usually not. Install Mupen64Plus-Next and test the game with its default settings first. Add a BIOS only when the specific core or content requires one, and use a lawfully obtained file with the correct name, region, version, and integrity in RetroArch’s system directory.
Are RetroArch save states safe as my only N64 saves?
No. A save state is an emulator snapshot and can stop working after a core, version, content, or configuration change. Use the game’s normal save system as your primary save and treat numbered state files as temporary convenience checkpoints.
Can I play N64 games online through RetroArch?
Local multiplayer is generally the practical choice. Mupen64Plus-Next supports up to four joypad users, but RetroArch’s official netplay guidance identifies N64 internet play as impractical under the current synchronization model because of performance requirements.
Do I need a capture card to record N64 games in RetroArch?
No. RetroArch can record software-emulated gameplay through supported FFmpeg/libavcodec builds. A capture card is useful for recording an external console or another video source, not for ordinary gameplay rendered inside RetroArch.
What’s actually slowing this PC down?
Pick the symptom - the matching free tool is one click away.
The Bottom Line
For ordinary N64 emulation, install RetroArch from a supported source, use Mupen64Plus-Next, load only lawfully obtained content, and keep the first configuration close to default. A careful controller remap and a 4:3 baseline solve more problems than immediately adding widescreen patches, texture packs, shaders, or accuracy-heavy options. Use ParaLLEl N64 for specific compatibility, 64DD, or hack-related cases, preserve normal in-game saves, and treat online N64 netplay as experimental rather than dependable.
Quick Recap
Product prices and availability are accurate as of the date/time indicated and are subject to change. Any price and availability information displayed on Amazon at the time of purchase will apply.




