You can build a desktop Fallout terminal replica from a LINSLABS physical kit or print the parts yourself from its digital files. Neither route gives you a finished computer: you supply the display, keyboard, computer and electronics, then assemble and finish the prop. It is a fabrication project, not a plug-and-play purchase.
What the Fallout terminal replica includes
The LINSLABS physical kit consists of unfinished printed shell sections and detail parts, including a keyboard plate. It does not include the computer electronics or the components needed to make the terminal work. LINSLABS describes it plainly: “It is not plug-and-play, and it is not intended as a beginner prop kit.” See the Fallout Terminal Build Kit listing for the current contents and listing details.
The project has two routes: buy the physical kit, or get the Vault Terminal digital files and print the parts at home. Both require assembly and finishing; digital files additionally require access to a suitable 3D printer and the work of producing the pieces.
Choose between the physical kit and digital files
| Consideration | Physical kit | Digital files |
|---|---|---|
| What you get | Unfinished printed shell sections and details, including a keyboard plate; electronics are not included. (LINSLABS listing: Fallout Terminal Build Kit) | Files for printing the project parts at home. (LINSLABS: Vault Terminal) |
| Printer access | Not required to obtain the printed parts. | A suitable 3D printer is required; exact printer specifications are not stated on the cited project page. |
| Assembly and finish | Assembly, seam filling, sanding, priming, painting and weathering remain part of the build. | Printing is an additional step before assembly and the same finishing work. |
| Electronics and computer | Builder supplies the monitor, keyboard, computer, wiring, controls and internal components. | Builder supplies the monitor, keyboard, computer, wiring, controls and internal components. |
| Total working-build cost | Not stated by LINSLABS; components vary by configuration. | Not stated by LINSLABS; printing and components vary by configuration. |
The choice is mainly about printer access and fabrication preference, not whether the result will be a working computer. For either route, plan for hands-on fit checks and finishing rather than expecting a ready-to-use prop.
#1 Best Overall
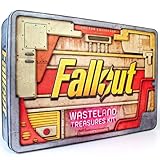
- AUTHENTIC FALLOUT WORLD ARTIFACTS: Includes 17 highly detailed replica items inspired by in-game props, factions, and symbols from across the Fallout universe, giving fans a tangible connection to the wasteland’s rich lore.
- PREMIUM COLLECTOR-GRADE REPLICAS: From Cooper Howard’s Sheriff Badge to the Pip-Boy metal sign, each licensed piece is crafted with exceptional detail to capture the look and feel of genuine relics from Fallout’s world.
- IMMERSIVE LORE-DRIVEN EXPERIENCE: Every item tells part of the Fallout story, creating a rich narrative journey through pre-war and post-war America. Highlighting stories, factions, and history within the Fallout universe.
- DISPLAY-READY LICENSED SET: Packed with flags, postcards, blueprints, signage, and documents designed for eye-catching presentation, making it ideal for shelves, themed rooms, gaming spaces, or personalized Fallout displays.
- UNIQUE GIFT FOR FALLOUT FANS: Perfect for gamers, collectors, and cosplayers, this kit offers an assortment of lore-rich memorabilia that enhances any Fallout-themed environment and celebrates the franchise’s iconic world.
Plan the working terminal’s components
LINSLABS identifies a Raspberry Pi or mini PC, a 9–10-inch LCD, and either a standard 60% keyboard or NIU Mini layout as possible component choices. It also notes that an Arduino can add control functionality. These are options, not a guaranteed-compatible parts list; verify dimensions, connections and power requirements against the specific case version and components you select.
- Computer: Raspberry Pi or mini PC, selected for the software and operating needs of your build.
- Display: 9–10-inch LCD; check the panel’s dimensions, mounting, connector and power needs.
- Keyboard: standard 60% layout or NIU Mini option; confirm the keyboard matches the included or printed plate.
- Controls: optional Arduino and associated wiring if you want physical inputs or added control functions.
- Finishing supplies: adhesive as needed, seam filler, sandpaper, primer and paint for assembling and finishing the shell.
Before ordering parts, compare the case’s internal dimensions with the computer, display, keyboard and cable routing you intend to use. The cited pages do not establish a complete bill of materials or a current total cost, so price a specific configuration rather than assuming the kit price covers a functional terminal.
Rank #2
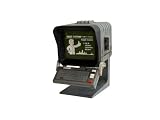
- Weathered retro terminal replica — A 3D printed miniature computer terminal display prop made from PLA plastic and finished by hand with an aged, worn sci-fi look.
- Three display options — Choose a removable desktop stand, a wall mount designed for two screws/dowels, or a SKÅDIS-style pegboard mount for compatible pegboard display setups.
- Hand-aged painted finish — Each terminal is artificially weathered by hand using special painting techniques, adding darker shading, worn edges and subtle distressed details for a used bunker-console appearance.
- Detailed decorative model — Includes a deep black screen hood, green static display panel, raised keyboard, side elements, top vents, mechanical body shape and small red, white and black button details.
- Compact indoor display piece — Approx. 16 cm / 6.3 in tall with the desktop stand and approx. 11 cm / 4.3 in wide. Decorative item only; not an electronic device or functional screen.
Build and finish the replica
- Choose the kit or file route. Confirm which shell version and keyboard plate you are using, then review the current product or project page.
- Select electronics before final assembly. Measure the display, computer and keyboard, and plan cable paths, mounting and power access. Check compatibility directly rather than relying on component names alone.
- Dry-fit the printed parts. Assemble sections without committing them permanently so you can identify alignment issues and confirm internal clearances.
- Join and prepare the shell. Use appropriate adhesive, fill seams, and sand the surface until joints and print lines are ready for primer.
- Prime and paint. Apply a suitable primer and paint in stages, allowing each layer to cure according to its product directions.
- Add weathering and install components. Apply the finish you want, then mount the display and keyboard, install the computer and controls, route wiring, and test the electronics before closing up the case.
Allow time for fabrication and surface finishing: LINSLABS characterizes the project as not intended for beginners, and the available pages do not establish a standard build time.
What a working Fallout terminal build can do
A working Fallout-style terminal is feasible, not merely a static display. Raspberry Pi Official Magazine documented a historical project using a 3D-printed case, TFT screen and Raspberry Pi 3. That example demonstrates the concept, but it is not a current parts recommendation or confirmation that those components fit the LINSLABS kit. See Raspberry Pi Official Magazine’s Fallout 4 working-terminal project.
Quick wins for a faster PC:
Scan for outdated or missing drivers - takes under a minuteDriver Scan →Clear out junk files and repair common Windows errorsFree Scan →Fix the driver behind crashes, sound loss and screen glitchesFind Drivers →Rank #3

- LUCY MACLEAN'S 80-PAGE DWELLER'S GUIDE BOOK – Dive into exclusive content with this comprehensive guide to surviving in Vault 33, filled with tips, lore, and untold stories from the Fallout TV series.
- VAULT-TEC TORCH PROJECTOR WITH 3 SLIDE DISCS – Illuminate your vault adventures with this nostalgic torch projector (batteries not included), featuring exclusive slide-discs that project never-before-seen scenes from the show.
- VAULT 33 FLAG AND METAL PLATE – Display your Vault 33 pride with a huge flag (18.1 in x 12.1 in) and a sleek metal plate (7 in x 5.3 in), perfect for decorating your gaming space or collector’s shelf.
- PERSONAL MEMENTOS FROM LUCY AND MONTY – Cherish key moments from the series with Lucy’s marriage application, a photo of her and Monty just married, and even a Hank Maclean photo for true fans of the story.
- GLOW-IN-THE-DARK VAULT BOY MAGNET AND BLUEPRINT MAP – Light up the wasteland with a glow-in-the-dark Vault Boy magnet, and plot your next adventure using the highly detailed Vault 33 blueprint map (16.5 in x 12.4 in).
For another full-scale build example, see Hackaday.io’s working Fallout Terminal replica project. Treat other builders’ configurations as inspiration; verify measurements and connections for your own case and hardware.
Independent reader supportYour contribution helps us test, update, and keep practical guides available for everyone.Do not confuse a terminal with a Pip-Boy replica
Bethesda’s Pip-Boy replicas are wearable Fallout collectibles, not desktop Vault Terminals. The Pip-Boy 3000 Replica and Pip-Boy 3000 Mk V Die-Cast Replica – Overseer’s Edition are different products from a maker-built computer terminal.
Quick Recap
Rank #4

- FALLOUT FANDOM: Head to the Nukacade and play all the arcade games you want with this replica Nuka-Cade Token!
- FUN DESIGN: As featured in Fallout 4, this Replica Token is embossed on both sides.
- DIMENSIONS: This coin is 38mm in diameter and supplied within a protective acrylic cup within its display pack.
- GREAT GIFT IDEA: Add this coin to your personal collection or gift it to the Fallout fan in your life!
Product prices and availability are accurate as of the date/time indicated and are subject to change. Any price and availability information displayed on Amazon at the time of purchase will apply.



