Recommended Free Tools
The correct cleaning method depends on the cooler. A serviceable custom loop can be drained, flushed and refilled, while a sealed all-in-one (AIO) cooler should not be opened or drained. Shut the PC down, disconnect power and identify the cooler before touching any fitting. For a custom loop, protect the electronics, drain the old coolant, rinse with distilled water, use a compatible cleaner only when necessary, refill with inhibited premixed coolant and leak-test before normal use. For an AIO, clean only the radiator, fans and exterior and follow the model’s warranty instructions.
Identify the type of water cooler first
Look through the side panel before planning a flush. An open custom loop normally has a reservoir, a pump, tubing joined by fittings, and blocks on the CPU or graphics card. It has service ports and is designed to be drained and refilled. A sealed AIO usually consists of a pump/block on the processor, two factory-sealed tubes and a radiator. Its coolant is not intended to be replaced by the owner.
As an Amazon Associate I earn from qualifying purchases.
| Cooler type | What you can service | What you should not do |
|---|---|---|
| Custom loop | Drain the loop, inspect blocks and radiators, flush, refill and leak-test. | Run the pump dry, use tap water, or introduce a cleaner that is not compatible with the loop’s metals and tubing. |
| Sealed AIO | Remove dust from radiator fins and fans, wipe the exterior, and inspect tubes and fittings for damage or leaks. | Open the pump or radiator, drain the factory coolant, or add a different fluid. Manufacturers describe this as outside the product’s intended service model. |
If you cannot find a reservoir, drain port or fill port, treat the unit as sealed. Consult the exact model’s manual and warranty documentation before removing anything.
Quick wins for a faster PC:
Clear out junk files and repair common Windows errorsFree Scan →Scan for outdated or missing drivers - takes under a minuteDriver Scan →Repair Windows errors before they cause bigger problemsFix Now →Prepare the work safely
Gather the right materials
- Absorbent paper towels placed under every fitting and around the reservoir.
- A container large enough to catch the complete loop charge.
- Distilled water for a rinse, never tap water.
- Premixed coolant containing corrosion, biological and scale inhibitors for the final fill.
- A suitable ATX jumper or test setup so the pump can run without powering the rest of the PC.
- A compatible purpose-made loop cleaner if inspection shows deposits, discoloration or biological growth.
- Compatible replacement tubing, fittings or O-rings if inspection finds damage.
- A small electronic air compressor only if you can direct its airflow safely into the drain container.
Check compatibility before choosing a chemical
Record the metals in the blocks and radiators, the tubing material and the coolant currently in the loop. Cleaner chemistry and inhibitor packages are not universal. A documented cleaning system may specify one cleaner followed by a separate flushing solution; follow those instructions rather than substituting a household product. If the manufacturer does not document compatibility for your combination of materials, use a distilled-water rinse and seek model-specific guidance instead of experimenting.
#1 Best Overall

- CONTACT FRAME FOR INTEL LGA1851 | LGA1700: Optimized contact pressure distribution for longer CPU life and better heat dissipation
- ARCTIC's P12 PRO FAN: More power at any speed - more powerful and quieter than the P12, especially at low speeds. Higher maximum speed for optimal cooling performance under high load
- NATIVE OFFSET MOUNTING FOR INTEL AND AMD: Shifting the cold plate center towards the CPU hotspot ensures more efficient heat transfer
- INTEGRATED VRM FAN: PWM-controlled fan that lowers the temperature of the voltage converters and thus ensures reliable performance
- INTEGRATED CABLE MANAGEMENT: The PWM cables of the radiator fans are integrated in the sheathing of the hoses so that only a single visible cable is connected to the motherboard
Make the PC safe to drain
Shut Windows down completely and disconnect the power supply from the wall and the PC. Do not rely on software shutdown while liquid is present. Position the case so the drain point is lower than the reservoir where possible, but do not twist a full reservoir or force tubing. Keep towels in place for the entire drain and first leak checks.
How to clean and refill a custom loop
1. Locate the drain and fill points
The easiest drain is a valve installed at the lowest point of the loop. If there is no valve, a tube connected to a reservoir stop port can direct fluid into a container. A reservoir stop plug can be loosened carefully, and gentle case tilting can help move fluid toward the drain. Plan the route before opening a fitting so the first release is controlled.
2. Drain the old coolant completely
- Place the container under the drain and surround nearby fittings with paper towels.
- Open the drain valve or remove the prepared stop plug slowly. Open a high point or reservoir cap only enough to admit air and let the fluid flow; keep the opening controlled so it cannot splash onto components.
- Carefully tilt the case in several directions to move trapped coolant toward the drain. Do not pull on tubing or fittings.
- If a tube must be disconnected, pinch or cap it before moving the case and keep the open end aimed at the container.
- When the main flow stops, close every port except the one directed into the container if you use air to clear residue.
A small electronic air compressor can push residual coolant out, but use low, controlled airflow and never allow liquid to spray into the case. The purpose is to move remaining fluid toward the container, not to pressurize the loop.
3. Inspect before deciding how aggressive the cleaning should be
Clear fluid with no residue generally needs only a rinse before refilling. Visible buildup, cloudiness, discoloration, biological growth or a change from one coolant color to another justifies opening the affected sections for inspection. Remove blocks or radiators only as far as needed to see the contamination and follow their service instructions. Photograph tubing routes before disassembly so every connection can be restored correctly.
4. Use a purpose-made cleaner only when the loop needs it
For ordinary maintenance, skip chemical cleaner and proceed to a distilled-water rinse. If deposits or growth are present, use a product whose instructions explicitly cover your loop’s materials. One documented procedure uses a dedicated Loop Cleaner, then a Superflush solution circulated for 15 minutes before draining. That timing applies to that procedure; it is not a universal duration for every cleaner.
Follow the cleaner’s concentration, circulation time and disposal directions exactly. Do not mix different chemistries in the loop. After a chemical treatment, continue rinsing until the drained liquid is acceptably clear and no cleaner odor or visible residue remains.
Rank #2

- Includes: 1x iCUE LINK XC7 RGB ELITE CPU Block, 1x iCUE LINK XD6 RGB Pump Reservoir Combo, 3x iCUE LINK RX120 RGB fans, 1x XR5 360mm Radiator, 1x iCUE LINK System Hub, XT Hardline Tubing & Fittings
- Gorgeous Hardline Cooling, Made Simple – This complete Hydro X Series custom cooling kit delivers the stunning look that only hardline loops can achieve, with iCUE LINK making the build simpler than ever.
- Dynamic RGB Lighting - Individually addressable RGB LEDs integrated into the CPU water block, pump/reservoir, and cooling fans give your PC a striking look to make it stand out from the crowd.
- Low-Noise Custom Cooling - CORSAIR iCUE software lets you adjust fan and pump settings, monitor temperatures, customize RGB lighting, and synchronize it with all iCUE-compatible products in your setup.
5. Rinse with distilled water
- Close all ports except the fill port and the drain path.
- Fill the reservoir with distilled water.
- Use an ATX jumper or equivalent test arrangement to power only the pump. The motherboard, graphics card and other components should remain unpowered.
- Watch the reservoir continuously. Stop the pump before the reservoir empties; a pump must not run dry.
- Let the distilled water circulate long enough to reach all sections, then shut the pump off and drain it into the container.
- Repeat the fill, circulate and drain cycle until the rinse appears acceptably clear. A cloudy or colored rinse means more flushing is needed.
Never substitute tap water. Its minerals and particulates can damage or clog a loop. Distilled water is a flushing medium, not automatically a suitable long-term coolant.
6. Reassemble the loop
Reconnect each tube to the photographed port and tighten fittings firmly by hand according to the component instructions. Replace damaged tubing, seals or fittings rather than trying to compensate by overtightening. Confirm that the drain valve is closed before filling and that every unused reservoir port has its stop plug installed.
7. Fill with the correct coolant
Use a premixed coolant containing corrosion, biological and scale inhibitors. A manufacturer may specify a particular formulation, such as XL5 Performance Coolant, for its ecosystem. Match the coolant to the metals, tubing and blocks in your loop. Do not use distilled water alone for long-term operation unless the manufacturer specifically requires an inhibitor treatment that you have prepared correctly.
8. Bleed air while keeping the reservoir supplied
- Pour coolant into the reservoir until the pump inlet is covered.
- Run only the pump and watch the level continuously.
- Stop the pump before the reservoir becomes empty, then top it up.
- Repeat short pump cycles until the liquid remains above the pump inlet.
- With the pump stopped, tilt the case carefully to release trapped air bubbles. Return it upright before starting the pump again.
- Continue topping up until the loop stays filled and air is no longer being drawn into the pump.
Keep all openings closed once filling is complete. A small air pocket in the reservoir can be normal during bleeding, but a pump that repeatedly draws air needs more coolant or a better-vented position.
9. Leak-test before powering the computer
Leave paper towels beneath every fitting and run the pump using the same pump-only test setup. Watch the reservoir level, all joints, the drain valve, the pump housing, blocks and radiator connections. Vent air and inspect repeatedly for a period before connecting full system power. If a towel becomes damp, stop the pump immediately, disconnect power, identify the fitting and correct it before testing again. Do not rely on evaporation to hide a small leak.
After the loop remains dry, reconnect the PC and start it while observing temperatures and fittings. Stress-test the system only after the initial operating check shows stable coolant flow and safe temperatures. Keep checking for leaks during the first full session.
Rank #3

- CONTACT FRAME FOR INTEL LGA1851 | LGA1700: Optimized contact pressure distribution for longer CPU life and better heat dissipation
- ARCTIC's P12 PRO FAN: More power at any speed - more powerful and quieter than the P12, especially at low speeds. Higher maximum speed for optimal cooling performance under high load
- NATIVE OFFSET MOUNTING FOR INTEL AND AMD: Shifting the cold plate center towards the CPU hotspot ensures more efficient heat transfer
- INTEGRATED VRM FAN: PWM-controlled fan that lowers the temperature of the voltage converters and thus ensures reliable performance
- INTEGRATED CABLE MANAGEMENT: The PWM cables of the radiator fans are integrated in the sheathing of the hoses so that only a single visible cable is connected to the motherboard
How to maintain a sealed AIO cooler
Clean the radiator and fans without opening the loop
Power off and disconnect the PC, then remove the case panel needed to reach the radiator. Clean dust from the radiator fins and fan blades with a method that does not bend the fins. Wipe the exterior of the pump/block and inspect the tubes, crimps and visible joints for wetness, cracking or unusual swelling. Make sure the fans spin freely and that the radiator is securely mounted.
Do not drain an AIO
Sealed AIO units are factory-filled and intended to require minimal maintenance. Guidance for sealed models says not to open a Kraken or similar AIO to drain or clean its coolant. Opening the unit can compromise the seal and warranty. If temperatures, pump noise or visible leakage indicate a failing AIO, document the symptoms and use the model’s warranty or replacement process rather than attempting a custom-loop flush.
Distilled-water flushing and coolant choices
Can distilled water be used to flush a loop?
Yes. Distilled water is appropriate for a rinse when the pump is operated in a pump-only test setup and the loop is drained afterward. Repeat the cycle until the discharge is acceptably clear. Distilled water does not remove every type of deposit by itself, so a compatible purpose-made cleaner may be needed when contamination is visible.
Crashes, No Sound, or Screen Glitches?
Random freezes, missing sound and display glitches usually trace back to one bad driver. Find and replace yours safely.Free scan · under a minuteWindows Errors? Fix Them Before They Spread
Repair common Windows errors and clear accumulated junk for a smoother, more stable PC - no reinstall needed.Free scan · no reinstallCan distilled water stay in the loop?
It is not the preferred long-term fluid because it does not provide the corrosion, biological and scale inhibitors supplied by a suitable premixed coolant. Use the coolant specified for your loop unless the manufacturer explicitly directs a treated distilled-water mixture and gives the inhibitor requirements.
What does a premixed coolant contribute?
The inhibitor package is intended to protect compatible metals and tubing while limiting biological growth and scale. A change in coolant color or formula can leave residue, so drain and rinse thoroughly rather than topping one formulation up with another.
Independent reader supportYour contribution helps us test, update, and keep practical guides available for everyone.When should a custom loop be changed?
One manufacturer recommends changing custom-loop fluid about every 12 months to remove particulate buildup and maintain thermal performance. Its filling guidance also describes six months as a conservative interval. Opaque or dyed fluids can require more frequent replacement because they may leave buildup. Treat these as manufacturer guidance, not a guarantee for every loop: the actual interval depends on fluid condition, materials, contamination, operating environment and whether the coolant formula or color is being changed.
Rank #4
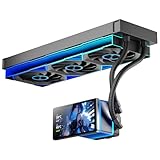
- [5.5 Inch LCD Smart Screen]Equipped with a 5.5-inch LCD smart screen with a resolution of 480*960. 270° rotation (adjustable 90°/180°/270°) is supported. Magnetic design for easy assembly, multi-angle display without dead angle, convenient to display customized content or hardware data
- [Customized Display Content] support imported video and pictures set as background, with a variety of customized design, covering video import, data display and visualization customization. With customized R&D software, the operation is intuitive and smooth, and the interface layout is clear to meet personalized needs
- [Better Cooling]Aluminum integrated heat sink design improves cooling efficiency by 40%. It can handle up to 320W TDP, with fan speeds of 800 - 2000±10% RPM, three fans with a total airflow of 165.1CFM, and an air pressure of 2.05mmH2O, guaranteeing excellent overclocking-level cooling
- [Radiator Parameters]PF360 water-cooled radiator size of 379 * 120 * 27MM, waterway length of 400mm, pump speed of 2700 ± 10%, fan size of 360 * 120 * 25mm, fan speed of 800-2000 ± 10%, noise ≤ 30db (A)
- [ARGB Synchronized Lights]Siamese ARGB Infinity Mirror fans and dual-ring ARGB water-cooling headers are synchronized with the 5V 3pin on the motherboard, and 1600W colorful soft-lighting effects create cool visual effects. Transparent shell + dual halo surround, enhance the chassis value, realize the whole machine lighting effect unity
| Situation | Practical response |
|---|---|
| Clear coolant and no deposits | Drain, rinse with distilled water and refill with compatible inhibited premixed coolant at the scheduled interval. |
| Opaque or strongly dyed coolant | Inspect more often and plan for more frequent changes if residue appears. |
| Cloudiness, visible particles, discoloration or biological growth | Drain, inspect blocks and radiators, use a compatible cleaner if its instructions cover the materials, then perform repeated distilled-water rinses. |
| Changing coolant color or formulation | Drain completely and rinse until the discharge is clear before adding the new coolant. |
Symptoms after cleaning and what to check
The pump makes a rattling or gurgling sound
Stop the pump before its reservoir supply is exhausted. Refill the reservoir and bleed trapped air with short pump cycles and careful case tilting. If the pump still draws air, inspect the reservoir level, pump inlet orientation and tubing route for a restriction.
Do these 3 things before closing this tab:
1Repair Windows errors before they cause bigger problems2Scan for outdated or missing drivers - takes under a minute3Clear out junk files and repair common Windows errorsTemperatures rise immediately
Check that the pump is running, the reservoir is supplying liquid and every block is connected in the intended flow path. Look for an air pocket trapped in a radiator or block. Confirm that the coolant level does not fall below the pump inlet. Do not stress-test until flow is stable.
The reservoir or tubing clouds again
Drain a sample into a clear container and inspect for particles or color separation. Residue may remain in a block, radiator or tube after an incomplete rinse. Repeat the distilled-water cycles, or use a compatible cleaner according to its documented procedure. Do not add a different coolant on top of the cloudy mixture.
A fitting or towel is damp
Stop the pump and disconnect power. Dry the area, identify the exact joint and reseat or replace the affected fitting, tube or seal. Restart only the pump for another leak test with fresh towels in place. A leak test is not complete until the towels remain dry during circulation.
The drain will not empty the loop
Open a controlled high point to admit air, tilt the case gently and check for a trapped section of tubing. If using an electronic air compressor, close every port except the path into the container so fluid cannot spray into the case. Never solve a blockage by applying uncontrolled pressure.
The Tool Desk
Outbyte PC Repair FREERepair Windows errors before they cause bigger problemsFix Now →Outbyte Driver Updater FREEFix the driver behind crashes, sound loss and screen glitchesFind Drivers →Quick Recap
Final checklist before returning to normal use
- The cooler was correctly identified as a serviceable custom loop or sealed AIO.
- All mains and PSU power were disconnected during draining and flushing.
- No tap water entered the loop.
- The pump never ran dry.
- Cleaner chemistry, tubing and coolant were compatible with the loop materials.
- The final fluid is a suitable premixed coolant with the required inhibitor package.
- The reservoir remains supplied while the pump runs.
- Every fitting, drain valve, block and radiator connection stayed dry during leak testing.
- The PC passed an initial temperature check before a longer stress test.
For the software side of a hardware troubleshooting session, Outbyte Driver Updater can scan more than 100 devices for outdated, corrupted or missing drivers, show current and recommended versions, install official drivers, and provide driver backup and restore with scheduled scans. It runs on Windows 11, 10, 8 and 7 and includes a 2-day free trial with no credit card before a subscription; results vary, and it cannot replace physical draining, flushing or leak testing.
Product prices and availability are accurate as of the date/time indicated and are subject to change. Any price and availability information displayed on Amazon at the time of purchase will apply.




