You can use an original SNES or Super Famicom controller as a wired USB gamepad by installing a small ATmega32U4-based board inside it. The board reads the controller’s existing serial button data and translates it into USB HID input; it does not replace the controller’s electronics. The documented build is a soldering project, and fitting the board and cable required trimming supports inside the controller shell.
How the SNES-to-USB conversion works
The original controller sends button states as serial data. A microcontroller inside the shell supplies the latch and clock signals, reads the data line, and converts the button states into a USB gamepad interface. The computer therefore receives ordinary HID gamepad input from the USB connection.
As an Amazon Associate I earn from qualifying purchases.
The project author, writing as Dome, describes the build in Building a USB SNES Controller. Hackaday’s coverage of the conversion identifies the board as an Arduino Pro Micro. Dome specifies an ATmega32U4-based small board, but does not identify a particular seller or retail model.
Parts and preparation
- An original SNES or Super Famicom controller with its cable and connector.
- A compact ATmega32U4-based board with USB HID capability. Check its dimensions, voltage, pinout, and USB connection before choosing one; the sources do not compare specific current boards.
- Wire and soldering equipment for connecting the controller conductors to the board.
- A computer and the Arduino HID Project library used by the example firmware.
This is an embedded conversion, not a plug-in adapter: the board goes inside the controller. Before applying power, verify the wiring of your own controller rather than assuming every cable or revision matches the documented unit.
#1 Best Overall

- The SNES Controller Adapter allows you to connect up to two SNES Controllers to your Switch/Switch 2 System or PC Windows.
- With two SNES Controller Adapters, up to four SNES controllers can be used at the same time.
- Supports PC Xinput and Dinput.
- Supports Turbo/Auto Fire/Hold functions. The Left Stick and D-Pad can be switched.
Controller wiring in the documented build
Dome’s pin table assigns these functions to the controller connector:
| Controller pin | Function |
|---|---|
| 1 | +5 V |
| 2 | Data clock |
| 3 | Data latch |
| 4 | Serial data |
| 5 | Not wired |
| 6 | Not wired |
| 7 | Ground |
For the controller described in the write-up, the wire-to-board connections are:
Rank #2
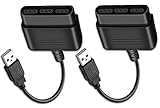
- Type: PS2 To PS3/PC Controller Converter, connect to your PS3 or PC USB Ports.
- Function: Adapter to use your PS2 controller on PS3 console or PC/Laptop, fully compatible with the console and control.
- Use: Converts PS2 or PS1 vibration controller to play with PS3 games on PS3 system, without requiring any external power or driver to operate. Easy to set up and use.
- Compatible With: All original and third party for PS2 Controller (wired and wireless), supports most of for P3 games and for P2 or P1 vibration controllers, can be directly used with PC computer.
- Application: Support wired For PS1/For PS2 hand lever and wireless For PS1/For PS2 hand lever. Applied on PC/For PS3.
| Wire color | Board connection | Signal |
|---|---|---|
| White | VCC | +5 V power |
| Brown | GND | Ground |
| Yellow | Pin 14 | Clock |
| Orange | Pin 15 | Latch |
| Red | Pin 16 | Serial data |
These color assignments describe the author’s controller and should not be treated as a universal wiring standard. Confirm each conductor and the board’s pin labels before soldering.
The Tool Desk
Outbyte Driver Updater FREEFix the driver behind crashes, sound loss and screen glitchesFind Drivers →Outbyte PC Repair FREEClear out junk files and repair common Windows errorsFree Scan →How the firmware scans buttons and sends USB input
The controller scan begins with a 12 microsecond latch pulse. The firmware then reads the serial data and clocks through 16 positions. The documented button order is B, Y, Select, Start, Up, Down, Left, Right, A, X, L, R, followed by four positions with no corresponding button. These timings and sequence are the author’s implementation, not a universal requirement for every controller or board.
Rank #3
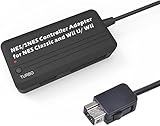
- Compatible with NES Classic Edition Controllers and Wii U/Wii
- Compatible with SNES Controllers to play the games on NES Classic Edition and Wii U/ Wii system
- No extra driver required, plug-n-play
- Built in Turbo
- The D-pad and the left stick can be exchanged
Dome’s code uses the Arduino HID Project library to initialize a gamepad, map the read positions to HID buttons and D-pad directions, and send updated input state to the computer. The loop includes a 16 ms delay; the author notes that the complete scan and delay make the update slightly faster than 60 Hz. No measured latency or performance comparison is reported.
Fitting the board inside the controller
Space is the main physical complication. Dome reports removing some supports from the rear cover to make room for the board and cable. The enclosure is therefore modified, and the described installation is not presented as reversible. Plan the board and wire routing before closing the shell, and avoid cutting more plastic than needed for clearance.
Rank #4

- DUAL PORT ADAPTORS: Includes 2 adapters with dedicated port for nes controllers and dedicated port for snes/Super Famicom controllers, allowing you to use your controllers
- SNAC TECHNOLOGY INCLUDED: Integrated SNAC module with USB 3.0 male connector offering a native connection with very low latency, ideal for games requiring precision and perfect timing
- FULL COMPATIBILITY: Works with Terasic DE10-Nano card, MiSTer IO card and SNAC compatible cores (NES, SNES and others depending on configurations), immediate system recognition
- PLUG-AND-PLAY INSTALLATION: Simple driverless setup required, sturdy and durable construction for heavy use, providing a true feel to vintage consoles
- AUTHENTIC RETROGAMING EXPERIENCE: No noticeable latency thanks to SNAC connection, allows players to use their true Nintendo controllers for a premium gaming experience
What compatibility has actually been shown
Dome reports that the computer recognized the board as a HID gamepad, that button presses registered, and that he played a race of Super Mario Kart. This is a report of one build and use case, not a compatibility test across operating systems, games, controller revisions, or Pro Micro clones. The write-up gives no latency measurements or long-term reliability results.
Quick wins for a faster PC:
Scan for outdated or missing drivers - takes under a minuteDriver Scan →Repair Windows errors before they cause bigger problemsFix Now →Alternatives if you do not want to modify the controller
Use an external adapter
An external socket-to-USB adapter could preserve the controller’s original cable and avoid opening the shell. Hackaday mentions this as an alternative, but the available project descriptions do not compare its cost, complexity, latency, or durability with the embedded conversion.
Choose a ready-made SNES-style USB pad
A ready-made SNES-inspired USB gamepad avoids modifying original hardware, though it is not the same as converting an original controller. Pimoroni’s Classic SNES inspired USB Controller listing says that the retailer no longer stocks that product; availability may change, so check with the maker or retailer before relying on it.
Quick Recap
Product prices and availability are accurate as of the date/time indicated and are subject to change. Any price and availability information displayed on Amazon at the time of purchase will apply.




