What’s actually slowing this PC down?
Pick the symptom - the matching free tool is one click away.
Most Valve Index faults can be narrowed down without replacing hardware. Read the SteamVR status color or controller LED first, then check power, USB, DisplayPort, base-station visibility, Windows device selection, and firmware. The sections below match the symptoms owners commonly search for and put safe checks before resets or replacement parts.
Tracking, display, playback audio, microphone input, and controller input are separate systems. A headset can show a green status while its microphone is mis-selected, or a controller can be powered while still unpaired. Work through the branch that matches your symptom, changing one thing at a time so you know which check made a difference.

As an Amazon Associate I earn from qualifying purchases.
Start with a five-minute triage
Before changing room layout or opening a speaker arm, establish whether SteamVR can see the device.
- Close the game and look at the SteamVR status window. A solid green device is ready; a device that is not green needs its device-specific checks.
- Confirm the PC, headset power adapter, base stations, and controller batteries are powered. Reseat a cable by removing it completely and inserting it again rather than merely pushing on the plug.
- Restart SteamVR. If the fault remains, use Steam’s Library properties to verify the integrity of the SteamVR tool files, check graphics-driver versions, rerun Room Setup, and restart Windows.
- Change only one thing at a time. That leaves a clear clue about which check changed the behavior.
- For a persistent fault, collect a SteamVR system report before contacting Steam Support. Support’s device-specific forms also identify where to find the serial number on the headset, controllers, and base station.
Do not assume that a single green status or a successful restart proves every subsystem is healthy. Tracking, display, speakers, microphone, and controller input can fail independently. If a check requires disconnecting a cable, power the relevant device down first and pull connectors straight, without twisting.
#1 Best Overall
Valve Index tracking drifts, floats, or loses devices
Tracking drift usually starts with the Lighthouse environment, not a dead headset. Check the stations’ power and line of sight before considering replacement hardware.
Correct the base-station environment
- Verify that every base station is powered and has completed its startup. Restart SteamVR after correcting a station that was off.
- Remove any protective film from the front of each station. Valve notes that film can interfere with tracking.
- Make sure stations can see the headset and controllers. Move lamps, curtains, furniture, monitors, tall plants, and other objects that block or sharply reflect the stations’ view. Windows and mirrors can also create a problematic line-of-sight test, so keep the active view as unobstructed as possible.
- Aim the stations toward the center of the play area. Valve’s recommended room-scale arrangement places them in opposite corners, at least 6.5 feet (2 meters) above the floor, tilted down 30–45 degrees, and no more than 16 feet (5 meters) apart. These are setup targets, not a guarantee for every room.
After moving a station, run the same short movement test in the middle and at the edges of the play area. If tracking improves in the center but fails near one wall, coverage or visibility is still the likely limitation. Avoid repeatedly pairing controllers when both controllers and the headset drift together; that pattern points to the Lighthouse environment.
Choose the right number and generation of stations
Valve recommends two stations for a typical room-scale area. One can cover seated or standing-only play, but two reduce the chance that a device loses sight of the tracking system. Areas larger than 5 × 5 meters (about 16 × 16 feet) may need additional stations for coverage and accuracy.
Index works with either Lighthouse generation, but do not mix 1.0 (HTC-branded) and 2.0 (Valve-branded) stations in one setup. Treat the generation rule as a compatibility limit, not a performance preference. If you inherited stations from different kits, identify their generation before adding another unit.
Check power-management behavior
Base-station power management is off by default. Valve recommends turning it on when the equipment is not in a shared tracking space; leave it off where multiple SteamVR installations share the same stations, because competing power commands can create confusing on/off states. In Valve’s words, “Valve recommends turning this feature ON if you are not in a shared tracking space.”
Separate room drift from a single-device fault
- If both controllers and the headset drift together, inspect station placement, film, power, and obstructions first.
- If only one controller disappears while the other remains stable, check that controller’s charge, firmware, and LED state before moving the stations.
- If tracking is stable in one part of the room but fails at an edge, improve station visibility or coverage rather than repeatedly pairing the devices.
- If a problem starts after furniture is moved, restore a clear view and rerun Room Setup before concluding that a sensor or station has failed.
Valve Index headset has no display, is not ready, or reports a connection error
A black or unavailable display means a connection in the headset-to-PC chain is not proper somewhere. Work through the complete chain, including connectors that can look seated when they are not.
Check all six links
- Confirm the headset power adapter is plugged into a working outlet and its connector is fully inserted.
- Connect the DisplayPort plug directly to a compatible graphics-card output. A laptop may require a DisplayPort adapter; verify that the adapter supports the headset’s video requirements.
- Use a USB 3.0 port for the headset’s USB connection.
- Check the PC-side connection and the breakaway connector. Separate and reconnect the breakaway section squarely.
- Inspect the main tether along its length, then unplug and fully reseat the headset-side connector. Valve notes that this plug can appear connected while not being fully inserted.
- Update the graphics driver, including its HD-audio component. A video driver installation that omits HD audio can cause related headset failures.
Valve describes the normal setup as three headset plugs: DisplayPort to the graphics card, USB to a USB 3.0 port, and the power adapter to an outlet. “The headset has three plugs,” Valve says in its setup guidance. Install SteamVR and update the graphics driver before first use.
Do these 3 things before closing this tab:
1Fix the driver behind crashes, sound loss and screen glitches2Repair Windows errors before they cause bigger problems3Scan for outdated or missing drivers - takes under a minuteRestart without disturbing the cable chain
From the SteamVR status window, restart the headset, or exit and relaunch SteamVR. If the status still shows an unavailable device, perform the general SteamVR recovery order in the triage section, then test again. Repeated connection errors after every plug and driver check justify a Steam Support case rather than repeated forceful cable reseating.
When testing a black display, avoid changing several video outputs at once. Note whether SteamVR sees the headset even when its panels remain dark; that distinction helps support separate a display-path problem from a broader USB or power problem. Keep the breakaway connector accessible while testing, but do not yank the tether to disconnect it.
Rank #2

- VR Experience: Immerse yourself in virtual reality with the Valve Index VR headset, designed specifically for PC and SteamVR platforms for seamless gaming and interactive experiences
- Display Quality: Experience crystal-clear visuals with high-resolution displays and optimized optics that deliver stunning graphics and reduced screen-door effect
- Comfort Design: Ergonomically engineered headset with adjustable head strap and face gasket ensures comfortable extended wear during long gaming sessions
- PC Integration: Seamlessly connects with your PC to access SteamVR's extensive library of virtual reality games, applications, and experiences
- Renewed with CPS 1-Year Warranty for added hardware protection.
Index off-ear speakers have no sound or low volume
Speaker output and microphone input use different Windows devices. A working microphone does not prove the speakers are configured correctly.
Restore playback selection
- Put the headset on and confirm it is solid green in SteamVR.
- With SteamVR running, select Index as the active Windows output device.
- In SteamVR’s audio settings, set Index as the default playback device.
- Temporarily unplug other playback devices, then test from the Windows Sound Panel. This removes competing HDMI, USB, or monitor outputs from the test.
- Check the SteamVR volume slider and make sure nothing is inserted in the 3.5 mm jack behind the face gasket.
Test a system sound and a second application. If one application is silent while another plays, inspect that application’s own output selection and volume before touching the headset. If both are silent, keep the test focused on Windows and SteamVR playback devices.
Free tools Windows power users keep installed
One-click scans. No signup required.
If volume is low rather than absent
Check that each off-ear arm is positioned beside, rather than pressed against, the ear. Test another application to distinguish an application-level volume setting from a headset problem. If the level remains low, restart SteamVR and Windows after confirming the speaker position.
Inspect contacts only when settings are correct
Valve’s contact-cleaning procedure allows the audio arms to be removed with a T6 Torx driver. Support warns that lateral force can damage the pogo pins. Hold the headset’s weight, support the arm, pull it straight out, and avoid prying or twisting. When reinstalling, align the pins with the gold contacts and push straight in. This is a narrowly targeted repair step, not a general cure for an incorrectly selected Windows device.
Do not use the T6 driver to force a stuck arm or to open unrelated parts of the headset. If the contacts look damaged after a careful inspection, stop and use Steam Support or a documented repair guide rather than bending the pins.
Valve Index microphone is not working
Set the recording device separately from speaker playback.
- Confirm the headset is solid green in SteamVR.
- In Windows recording settings, choose Digital Audio Interface (Valve VR Radio & HMD Mic) as the default recording device.
- Open SteamVR Settings > Audio and set Set Record device to the same headset microphone.
- If Windows switches back to another microphone, close and relaunch the game or restart SteamVR after making the selection.
Test in a Windows recording panel or a known voice application before changing game-specific voice settings. If Windows never lists the Valve recording device, return to the USB, driver, and headset-connection checks in the display section. Do not infer microphone failure from silent speakers: playback and recording are separate paths.
Valve Index controller is not pairing, tracking, charging, or registering input
The status LED is the quickest diagnostic signal. Blue means the controller is powered but unpaired; flashing red indicates an error; an unlit LED means it is not powered. A controller that is not solid green in SteamVR should be handled with Valve’s LED-based troubleshooting rather than immediate replacement.
Charge and update first
- Charge the controller, confirm its status in VR Monitor, and install any offered firmware update.
- Restart SteamVR after charging or updating.
- Inspect the USB-C socket and cable. Do not play while the controller is plugged in: Valve warns that pulling a charge cable at an angle can damage the connector.
Use the included charge cable or a cable with a slim USB-C housing that does not put sideways pressure on the port. The controller does not use USB Power Delivery; Valve says fast charging can use a USB port capable of at least 1 amp with the included USB-A-to-USB-C cable. A bulky plug housing or a cable pulled sideways can create a charging fault that resembles a dead controller.
Rank #3
- HEADSET ONLY. (MAY NOT INCLUDE HEAD STRAP ADJUSTMENT PAD). Controllers and base station purchased seperately
- 5x IMPROVEMENT over first-generation PC VR HMDs.
Pair a blue controller
- Open SteamVR and choose Devices > Pair Controller.
- Hold System and B on the controller for a few seconds until pairing begins.
- If pairing does not complete, power-cycle the controller and repeat the pairing path.
Pair one controller at a time if both are unpaired, and keep the headset and stations powered while pairing. If the LED changes from blue but SteamVR still does not show solid green, continue with charging, firmware, and tracking checks instead of repeating the same pairing command.
PC Slower Than It Used to Be?
A free scan shows the junk files, broken settings and background clutter dragging Windows down - then fixes them in one click.Free scan · Windows 10 & 11Crashes, No Sound, or Screen Glitches?
Random freezes, missing sound and display glitches usually trace back to one bad driver. Find and replace yours safely.Free scan · under a minuteRecover a sluggish Track Button
Valve says input can be affected when the Track Button is touched while the controller powers on. Hold System for five seconds to turn it off, wait two seconds, then power it on without touching the Track Button. Repeat the sequence if the button remains sluggish.
Perform the hard reset sequence
- Connect the controller by USB and charge it for ten minutes.
- Unplug the cable.
- Hold System for fifteen seconds, then release it.
- Power the controller on and check SteamVR status.
If a firmware update was followed by a flashing red LED, contact Steam Support instead of trying an improvised recovery. A persistent pairing, tracking, or input failure also needs a support case with the system report.
Interpret common controller patterns
| What you see | Most useful next check | What not to do |
|---|---|---|
| Blue LED | SteamVR > Devices > Pair Controller, then System + B | Do not replace a controller before pairing and power-cycle checks. |
| Flashing red LED | Stop after safe charge/restart checks and contact Steam Support, especially after firmware | Do not invent a firmware recovery procedure. |
| LED off | Charge it and verify its status in VR Monitor | Do not assume tracking hardware has failed before confirming power. |
| Not solid green in SteamVR | Use the matching LED, firmware, pairing, and tracking branch | Do not continue playing while a damaged charging connector is under strain. |
SteamVR status, Room Setup, and play-area faults
Use Valve’s general recovery order
- In Steam’s Library, open SteamVR’s Properties and verify the integrity of its tool files.
- Check that the graphics driver is current.
- Restart SteamVR.
- Rerun Room Setup.
- Restart Windows.
Use a device-specific article when the affected headset, base station, or controller is not solid green in the SteamVR status window. A general software reset cannot correct a blocked Lighthouse view or a loose DisplayPort plug.
Prepare a safe room-scale boundary
Valve’s initial room-scale guidance calls for at least 2 m × 1.5 m (6.5 ft × 5 ft) of clear space. Remove furniture, stairs, and windows from the active area and ensure that outstretched arms cannot strike anything. Standing and seated setups require less room, but the boundary still needs to be clear of hazards. Rerun Room Setup after substantially changing station positions or the usable play area.
Recommended Free Tools
When a cable or part may actually need replacement
Consider a replacement tether only after the headset power, USB, DisplayPort, breakaway connector, headset-side seating, and driver checks fail consistently. Confirm exact Valve Index compatibility before ordering; a generic DisplayPort or USB cable is not automatically a substitute for the complete tether assembly. Steam Support lists a Valve Index Replacement Tether, but availability and price can change, so verify the current product details before buying.
A T6 Torx driver is relevant only to the documented off-ear speaker-arm contact procedure. It is not a universal Index repair tool. For parts and repair instructions, use an established repair guide such as iFixit’s Valve Index material and follow the connector warnings above; do not pry on the audio-arm pins or pull any tether sideways.
Independent reader supportYour contribution helps us test, update, and keep practical guides available for everyone.Escalate to Steam Support with useful evidence
Open the device-specific Steam Support flow when the symptom survives its matching checks, when a controller shows a flashing red LED after firmware, or when the headset repeatedly reports connection errors. Attach a SteamVR system report and describe exactly which LED or SteamVR status color appears. Include the serial number requested by the form for the headset, controller, or base station, and list the cables, ports, stations, and Windows devices already tested. That information lets support distinguish a setup fault from a hardware failure without asking you to repeat every basic check.
Keep notes on what changed the symptom: a station moved, a film removed, a cable reseated, a playback device selected, or a reset completed. A concise timeline is more useful than a list of every setting on the PC. Do not claim a part is defective solely because one game fails; reproduce the issue in SteamVR status, Windows Sound Panel, or another known application when possible.
Quick wins for a faster PC:
Fix the driver behind crashes, sound loss and screen glitchesFind Drivers →Clear out junk files and repair common Windows errorsFree Scan →Scan for outdated or missing drivers - takes under a minuteDriver Scan →Rank #4
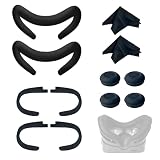
- Ice Silk & High Breathability: Designed specifically for Valve Index VR headset, the ice silk face gasket offers exceptional breathability, keeping your face cool and dry during long gaming sessions
- Machine Washable & Hygienic: The face gasket is machine washable for easy cleaning; together with the included cleaning cloths, you can quickly wipe down the headset and gasket, making shared use more hygienic and worry-free
- 2-Pack Face Gaskets + 4 Thumbstick Covers: Includes 2 replaceable ice silk face gaskets for easy swapping, plus 4 thumbstick covers that protect your Valve Index controllers from wear and tear, enhancing grip and control during intense gameplay
- 2 Cleaning Cloths + 2 Sets of Velcro Straps: The microfiber cleaning cloths safely clean lenses and face gaskets for a clear view; the 2 extra Velcro straps ensure a secure, non-slip fit even after extended use
- Lightweight & Comfortable Design: Thinner and lighter than standard foam padding, reducing pressure on your cheeks and forehead. Comfortable even with glasses, so you can stay fully immersed in VR
Frequently asked questions
Frequently Asked Questions
Why is my Valve Index controller not tracking when the headset works?
Check that controller’s charge, firmware, LED, and pairing first. A blue LED means it is powered but unpaired, an unlit LED means it is not powered, and a flashing red LED indicates an error. If the headset and the other controller track normally, correct the individual controller before moving base stations.
How many base stations does Valve Index need?
Valve recommends two for a typical room-scale area. One can be sufficient for seated or standing-only play, but two reduce the chance of losing sight of a device. Areas larger than 5 × 5 meters may need additional coverage. Do not mix Lighthouse 1.0 HTC-branded stations with 2.0 Valve-branded stations.
What should I do when tracking is drifting or floating?
Check station power, remove protective film, clear obstructions or strong reflections, and aim stations toward the center. Valve’s room-scale targets are at least 2 meters high, angled down 30–45 degrees, in opposite corners, and no more than 5 meters apart. Rerun Room Setup after correcting the environment.
Why does my Valve Index headset have no display?
Check the outlet and power adapter, DisplayPort connection to the graphics card, USB 3.0 connection, PC-side and breakaway connectors, and the headset-side tether seating. Update the graphics driver including HD audio, then restart the headset or SteamVR. A laptop may require a compatible DisplayPort adapter.
Why is there no audio on the off-ear speakers?
With SteamVR running and the headset solid green, select Index as the Windows output and default SteamVR playback device. Unplug competing playback devices, test Windows Sound Panel, check the SteamVR volume slider, and ensure nothing is in the 3.5 mm jack. Speaker output and microphone input are separate settings.
How do I fix a Valve Index microphone not working?
Set Digital Audio Interface (Valve VR Radio & HMD Mic) as the default Windows recording device, then choose the same device in SteamVR Settings > Audio > Set Record device. Relaunch the game or SteamVR if Windows keeps switching devices.
What does a controller that is not solid green mean?
Use the LED state to choose the next check. Blue means powered but unpaired; flashing red means an error; off means no power. Charge and update before pairing or resetting. A flashing red LED after firmware is a reason to contact Steam Support rather than attempt an unlisted recovery.
Can I play while an Index controller is charging?
Valve warns against playing with the charge cable connected because pulling it at an angle can damage the connector. Use the included cable or a slim USB-C plug housing, and charge from a USB port capable of at least 1 amp; the controller does not use USB Power Delivery.
When should I buy a replacement tether?
Only after checking power, USB, DisplayPort, the breakaway connector, headset-side seating, and graphics drivers consistently. Confirm exact Valve Index compatibility and current availability. A generic DisplayPort or USB cable is not automatically a substitute for the complete tether assembly.
What should I send Steam Support?
Provide a SteamVR system report, the exact SteamVR status color or controller LED behavior, the serial number requested for the affected device, and a list of cables, ports, base stations, Windows playback or recording devices, and resets already tested.
The Bottom Line
Start with the signal you can see: SteamVR status for the headset and stations, or the LED for a controller. Correct power, visibility, cable seating, Windows device selection, firmware, and Room Setup before opening hardware or buying parts. If the fault remains, stop repeating risky connector movements, attach a SteamVR system report, and let Steam Support match the symptom to the device.
Quick Recap
Product prices and availability are accurate as of the date/time indicated and are subject to change. Any price and availability information displayed on Amazon at the time of purchase will apply.
The Tool Desk
Outbyte PC Repair FREEClear out junk files and repair common Windows errorsFree Scan →Outbyte Driver Updater FREEFix the driver behind crashes, sound loss and screen glitchesFind Drivers →



