Free tools Windows power users keep installed
One-click scans. No signup required.
You can turn an old desktop PC into a bartop arcade by fitting it, a compatible monitor, arcade controls, speakers and cooling into a compact cabinet. Plan the cabinet around the specific monitor and computer you have: screen dimensions, video connections, control-panel clearance and airflow determine the layout. The build combines woodworking, PC installation and emulator setup, so mock up the parts before cutting and leave access for maintenance.
Choose the computer, monitor and controls first
Inventory the hardware and the space where the cabinet will sit. Check the donor PC’s video output and operating-system compatibility, measure the monitor including its mounting points, and note the dimensions of the joystick bodies and buttons beneath the control panel. The cabinet should fit those real parts rather than an assumed standard.

Pick a monitor that fits the cabinet
Two source projects illustrate different approaches, not a universal best choice. David Beauchamp’s 2015 Make: build used a used 4:3 VGA monitor; Microsoft’s cabinet guide uses a 22-inch HDMI monitor. Compare the display’s physical dimensions, aspect ratio, connector compatibility with the PC, and mounting and service-access requirements. Neither project establishes that one format is better for every build.
Beauchamp says the Make: project includes dimensioned plywood blueprints, with measurements in millimeters except for holes, and used half-inch birch plywood. Adapt the opening and cabinet depth to the display you select instead of copying dimensions without checking fit. See the Make: project and blueprints; Microsoft’s cabinet guide provides a different design example.
#1 Best Overall

- Dimensions (approx.): Interior Width: 20.75", Exterior Width: 21.75”, Exterior Height: 21”, Exterior Depth: 18”
- Available in HAPP (HAPP joysticks and 28mm buttons) or Sanwa (Sanwa Style joystick and 24mm start/coin and 30mm action buttons) Style
Choose controls and their interface
For a conventional cabinet, plan the player count, joystick positions, button count and layout, wiring, and the space needed below the panel. Joystick directions and button switches need an interface the PC can recognize. In Beauchamp’s build, they connect to a two-player USB adapter, which connects to the PC; the controls can then be reassigned in software. A bundled joystick-and-button kit with a USB encoder may simplify sourcing, while separately chosen parts offer more control over layout. In either case, verify PC compatibility, included wiring and underside clearance before drilling.
Make a parts and tools plan
Build the list around your chosen hardware. The documented examples support the following categories; they do not establish current prices or endorse particular listings.
| Build area | Plan for | Check before buying or cutting |
|---|---|---|
| Cabinet | Plywood panels and reinforcement lumber | Material thickness, cabinet footprint, monitor opening and panel dimensions |
| Display and computer | Donor desktop PC and a monitor | Monitor fit and mount, available video connector, and operating-system support |
| Controls | Joysticks, buttons, wiring and a USB interface | Player count, layout, included wiring, PC compatibility and clearance beneath the panel |
| Sound and cooling | Speakers and, if needed, intake and exhaust fans | Placement, airflow through the actual PC and access for service |
| Woodworking tools | Jigsaw, drill and suitable bits | That you can operate them safely and make the required cuts accurately |
Microsoft’s guide describes a plywood cabinet with two-player controls and either Windows or Raspberry Pi instructions. It explicitly warns that power tools are required and advises following safety procedures or asking a professional for help. Beauchamp’s project also includes routing mains power and mounting PC components inside the cabinet. Do not undertake wiring or powered-electronics work beyond your skill level.
Build the cabinet around the parts
- Measure and sketch. Record the monitor’s outer dimensions, mount, cable positions and required viewing opening. Measure the computer and its connections, plus the speakers and control hardware. Check the available space for the finished cabinet.
- Mock up the control panel. Mark the joystick and button positions at full size. Check hand spacing from the top and clearance for the joystick bodies below. Beauchamp reports that a layout miscalculation required a small wall modification; a physical mock-up can catch similar conflicts before drilling.
- Cut the panels and reinforce the joints. Use your adapted measurements to cut the plywood, then add corner reinforcement. The Make: example used pine reinforcement and half-inch birch plywood, but those material choices do not replace checking the needs of your own design.
- Fit the controls. Drill the button and joystick openings to suit the actual parts. Install the hardware, connect the switches to the USB control adapter, and verify the wiring before enclosing the underside.
- Mount the display and computer. Secure the monitor and PC components so they remain stable and their cables can be reached. Position speakers and plan how you will open the cabinet to troubleshoot or replace hardware.
- Provide cooling and service access. Keep the PC’s airflow path in mind; add intake and exhaust fans if your arrangement needs them. Beauchamp used fans and hinged control and back panels, but that cooling configuration is specific to his cabinet. Assess the heat and airflow requirements of your actual computer rather than copying it blindly.
- Finish the software setup. Install an operating system and emulator versions supported by the donor PC, connect the USB controls, and map the buttons and directions. A front end is optional; test the setup before closing access panels.
Choose software for the donor PC, not the old project list
Beauchamp’s 2015 setup used Windows XP, GameEx and several emulators. Those are historical details, not a current compatibility recommendation. Check that the operating system and the specific emulator versions you choose support the PC’s hardware, and confirm that the control interface is recognized before final assembly. Microsoft’s guide offers Windows or Raspberry Pi control instructions, but that does not guarantee compatibility with every old desktop.
What’s actually slowing this PC down?
Pick the symptom - the matching free tool is one click away.
Rank #3
- Dimensions (approx.): Interior Width: 20.75", Exterior Width: 21.75”, Exterior Height: 21”, Exterior Depth: 18”
- Available in HAPP (HAPP joysticks and 28mm buttons), Sanwa (Sanwa Style joystick and 24mm start/coin and 30mm action buttons) Style, or BLANK with no joystick or button holes
Set realistic expectations for time and cost
The Make: project page lists 3–4 days as its required time. In his conclusion, Beauchamp separately says he spent about a week building the cabinet over a few hours per day and another similar amount configuring software. These are distinct statements about his 2015 project, not a current schedule for every builder.
Beauchamp also reported an approximate total of $285 for that build, which included a computer he already owned and the monitor, controls and power strip at the prices he paid then. It is not a current project budget. The available examples do not establish a representative current cost, so price your own materials and hardware rather than treating that historical total as a target.
Rank #4

- Bartop Arcade Cabinet for Pandora's Box
Further cabinet planning
I Like To Make Stuff offers paid digital plans for a bartop cabinet described as using a 17-inch 4:3 monitor and less than one sheet of half-inch plywood. These are plans for that design, not dimensions that automatically fit a different monitor or donor PC. View the digital plans.
Quick Recap
Best Value
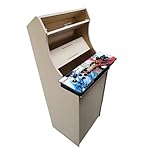
- Dimensions (approx.): Interior Width: 20.75", Exterior Width: 21.75”, Exterior Height: 54”, Exterior Depth: 18”
- If your Pandora's box is shaped like the one in the product image, it will work with this kit. If you have questions about yours, please send us a pic for confirmation
Product prices and availability are accurate as of the date/time indicated and are subject to change. Any price and availability information displayed on Amazon at the time of purchase will apply.